When it comes to fall nail trends, coffin nails are making a splash this season. Their unique shape offers a perfect canvas for stunning designs that capture the essence of autumn. Are you looking for fall coffin nails that combine cuteness and brightness? Or perhaps you’re looking for simple yet elegant ideas that complement your fall wardrobe? This article will answer all your questions and provide you with inspiration and practical tips to achieve the perfect fall manicure.
Comfortable coffin nails in brown tones
For a sophisticated and warm look, these brown coffin nails are a fantastic choice. The rich chocolate brown shade is perfect for fall and gives your nails a cozy and chic look. The accent nail with a subtle mottled effect adds a touch of uniqueness without overshadowing the simplicity of the design.
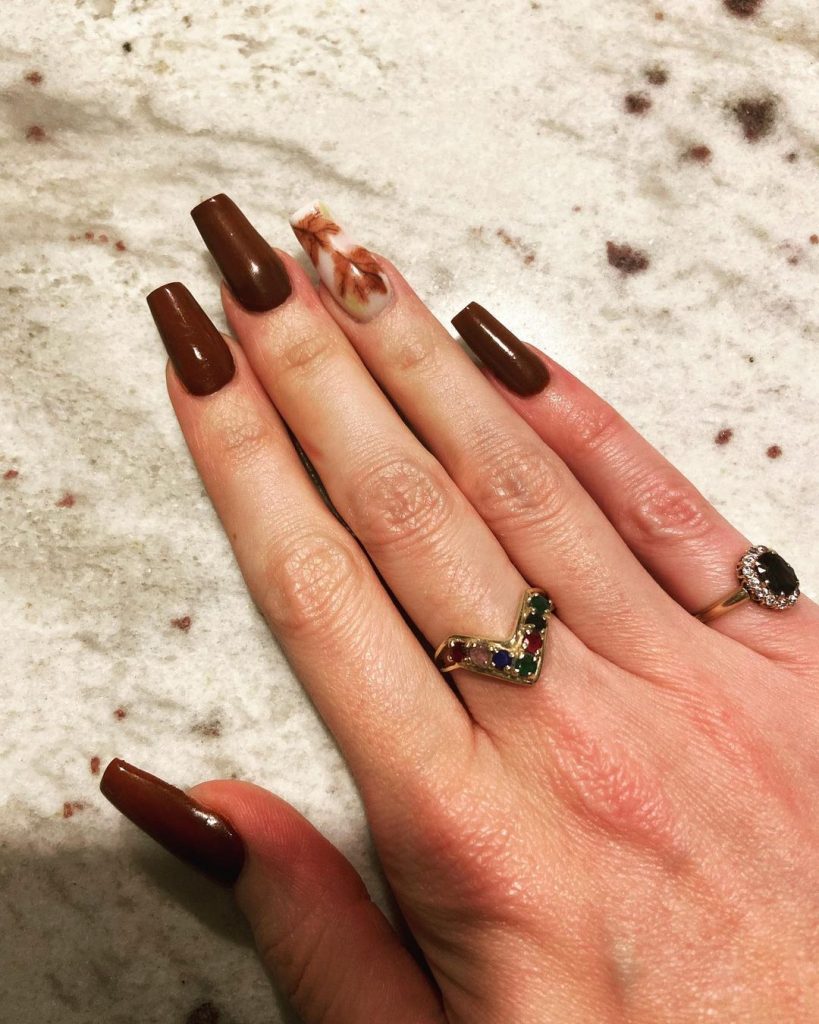
This design perfectly captures the autumn mood with its earthy tones. The brown color is versatile and stylish, making it suitable for a variety of occasions. The mottled detailing adds just the right amount of style without being too flashy.
Consumables
- Base Coat: OPI Natural Nail Base Coat
- Nail Polish: OPI in ‘Chocolate Moose’
- Marbling Tool: Ejiubas Nail Stamper Kit
- Top Coat: Seche Vite Dry Fast Nail Top Coat
DIY instructions
- Apply a base coat to protect your nails.
- Paint your nails with two coats of chocolate brown polish.
- Use the marbling tool to create the marbled effect on the accent nail by mixing white and brown polish.
- Finish with a top coat to seal the design and add shine.
Elegant spiral coffin nails
These nails are a true work of art, combining neutral tones with intricate spiral designs. The combination of nude and blue tones with golden details creates a sophisticated and elegant look.
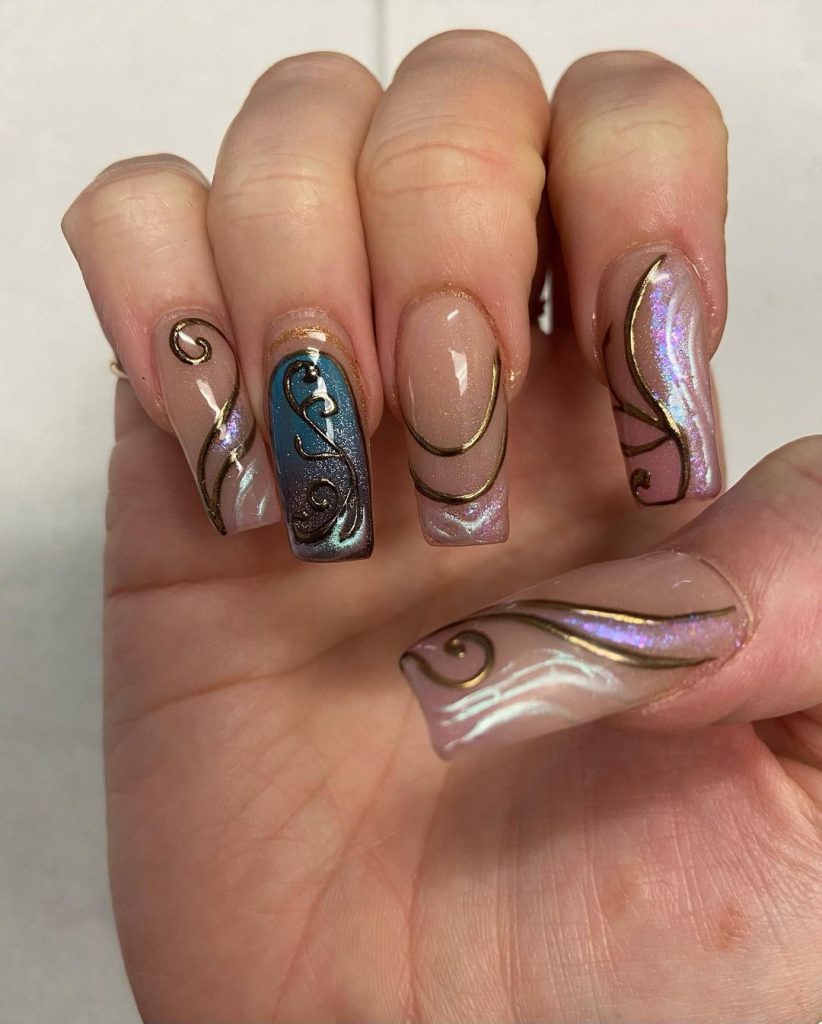
The spiral designs add a touch of elegance and creativity, making these nails stand out. The combination of neutral and blue tones ensures that the nails are eye-catching and elegant. The golden details add an element of luxury, perfect for any fall event.
Consumables
- Base Layer: Essie Here to Stay Base Layer
- Nail polish: Essie in ‘Topless & Barefoot’ and ‘Aruba Blue’
- Nail Art Brush: Beetles Nail Art Liner Brushes
- Gold Foil: Gold Foil Flakes for Nail Art
- Top Coat: Sally Hansen Miracle Gel Top Coat
DIY instructions
- Start with a base coat to prep your nails.
- Apply the nude polish on all nails, leaving one nail accented for the blue shade.
- Use the nail art brush to create spiral designs with the blue polish on selected nails.
- Carefully add gold foil details to enhance the swirl design.
- Seal everything with a top coat for a glossy finish.
Festive Fall Glitter Coffin Nails
Nothing says fall like a little sparkle and glitter! These nails incorporate black and gold glitter, creating a festive and glamorous look perfect for the fall season.
The combination of black and gold glitter creates a dramatic and festive look. This design is perfect for those who love sparkle and want to stand out. Glitter not only adds sparkle but also enhances the overall autumnal vibe.
Consumables
- Base layer: ORLY Bonder base layer
- Black nail polish: China Glaze in ‘Liquid Leather’
- Golden glow: Kiara Sky’s spreadable powder in ’24K’
- Glitter Top Coat: INM Out The Door Northern Lights
DIY instructions
- Apply a base coat to all nails.
- Paint your nails with black polish, leaving the nails accented for applying shine.
- Dip your accent nails into gold glitter powder while the polish is still wet.
- Apply a gloss top coat to seal the shine and add extra shine.
Vibrant orange gradient coffin nails
Embrace the fiery hues of fall with these vibrant orange ombré nails. The seamless gradient from bright orange to fiery red captures the essence of the changing leaves.
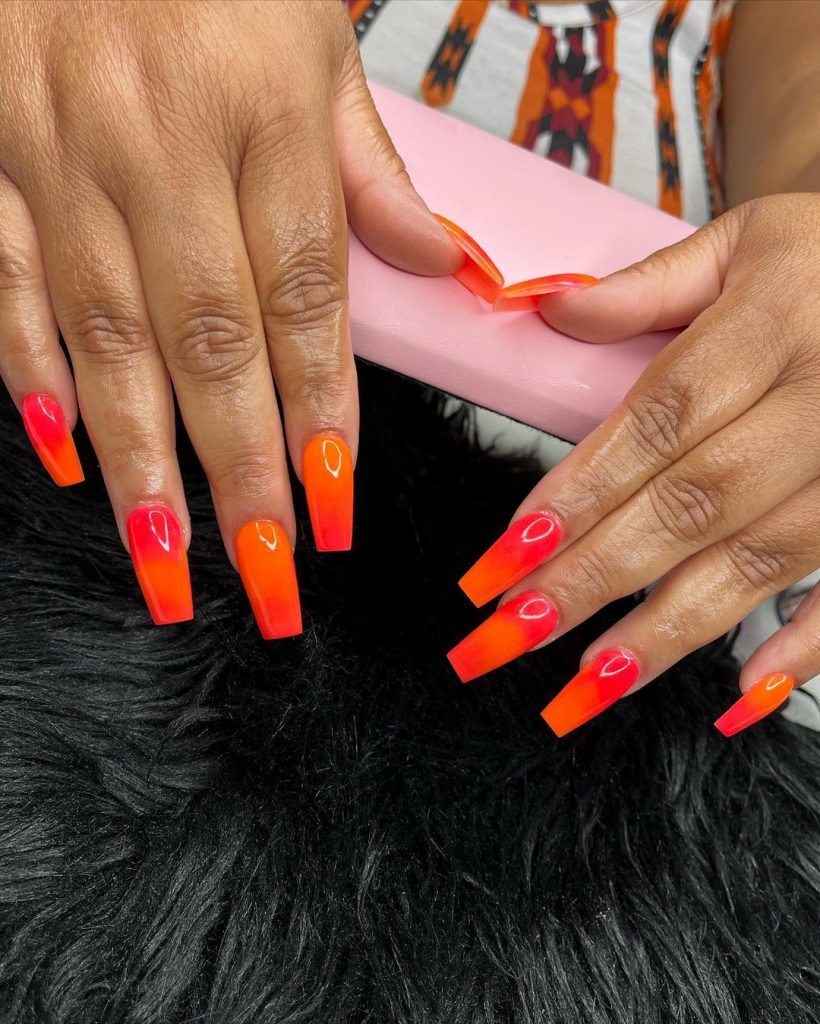
The gradient effect on these nails is eye-catching and vibrant, perfect for those who want their nails to reflect the intense colors of fall. The ombré design is visually striking and adds a dramatic touch to your manicure.
Consumables
- Base Coat: ZOYA Anchor Base Coat
- Orange Nail Polish: OPI in ‘A Good Man-darin is Hard to Find’
- Red nail polish: OPI in ‘Big Apple Red’
- Makeup Sponge: Triangular Makeup Sponges
- Top Coat: Essie Gel Setter Top Coat
DIY instructions
- Start with a base coat to ensure long-lasting wear.
- Apply a base color of orange polish on your nails.
- Using a makeup sponge, apply the red polish starting from the tips and blending it halfway up the nail.
- Repeat until you achieve the desired ombré effect.
- Finish with a top coat to soften the gradient and add shine.
Pumpkin Design Coffin Nails
These pumpkin-themed nails are perfect for embracing the autumn spirit. The cute pumpkin designs and neutral background create a fun and festive look that’s perfect for fall.
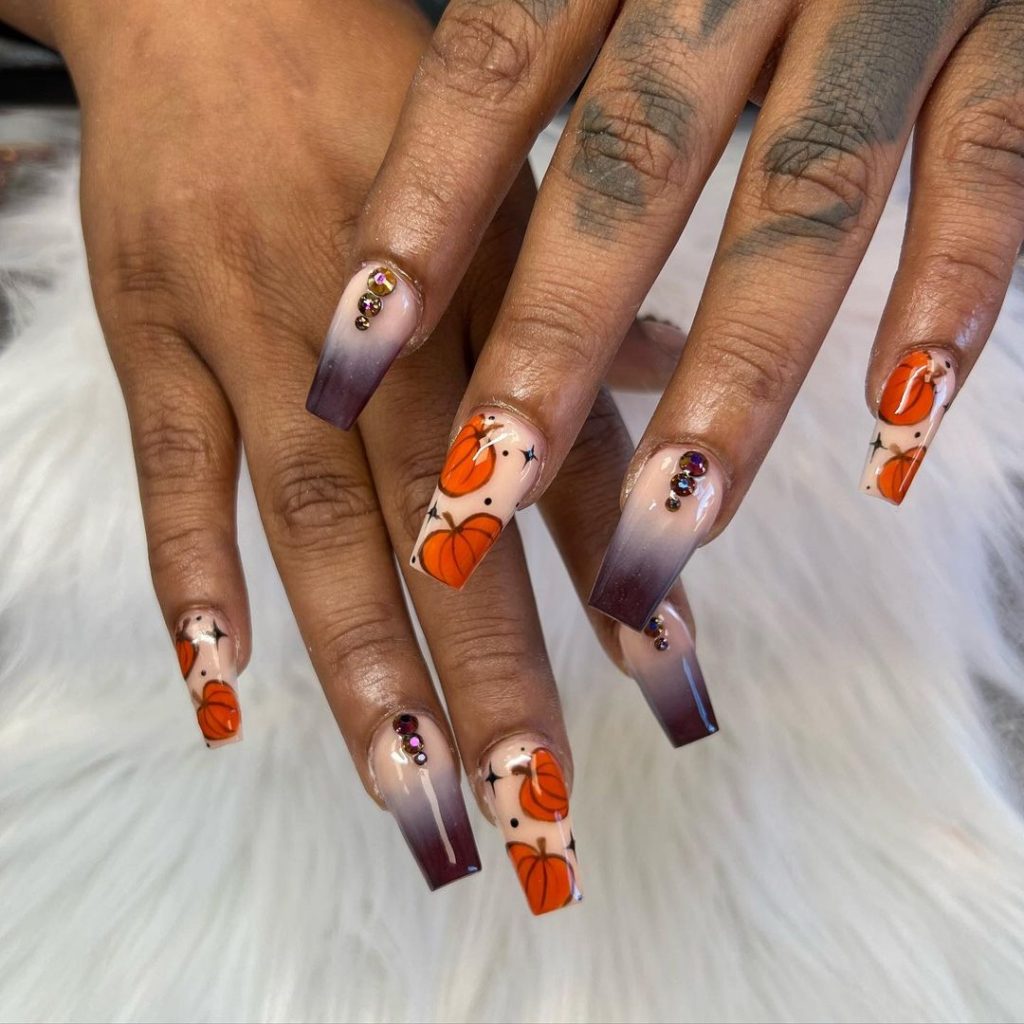
Pumpkin designs are adorable and add a fun touch to nails. The neutral background ensures that the pumpkins are the center of attention, making these nails a great choice for any fall activity.
Consumables
- Base Coat: Butter London Nail Base Coat
- Neutral nail polish: Essie in ‘Sand Tropez’
- Orange nail polish: Essie in ‘Playing Koi’
- Nail Art Brushes: Winstonia Nail Art Brushes
- Top Coat: Revlon ColorStay Gel Envy Diamond Top Coat
DIY instructions
- Apply a base coat to all nails.
- Paint your nails with the neutral polish as a base color.
- Use the nail art brush to paint small pumpkins on each nail with the orange polish.
- Add details to the pumpkins with a thin paintbrush and green nail polish for the stems.
- Seal the design with a top coat to protect your artwork.
Coffin nails in nude and shiny black tones
These nails feature a striking combination of black tips and nude bases adorned with iridescent rhinestones. The design is glamorous and eye-catching, making it perfect for those who love a little sparkle in their manicure.
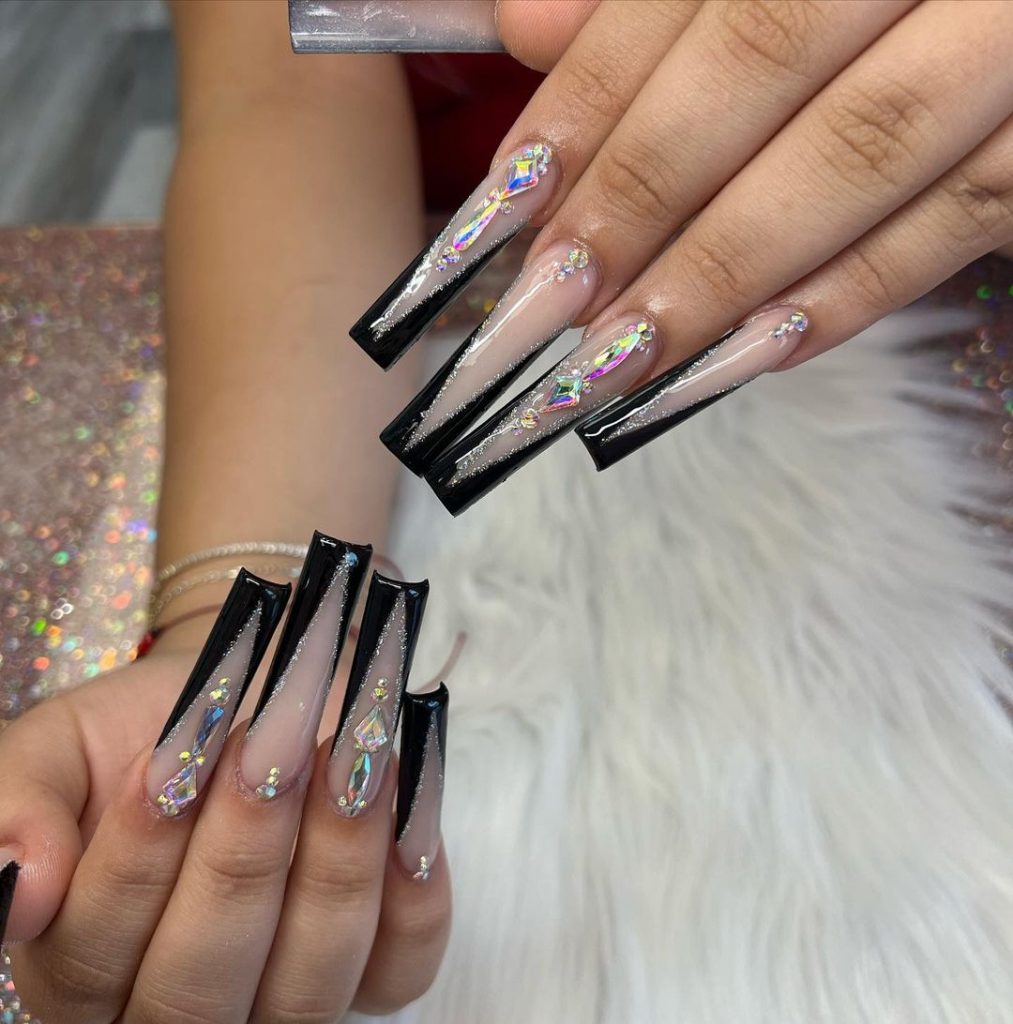
The contrast between the black tips and the nude base creates a dramatic effect, while the rhinestones add a touch of sparkle and luxury. This look is both bold and sophisticated, making it the perfect statement piece.
Consumables
- Base coat: CND adhesive base coat
- Nude nail polish: Essie in ‘Ballet Slippers’
- Black Nail Polish: Sally Hansen Hard as Nails Xtreme Wear in ‘Black Out’
- Rhinestones: Saviland Nail Art Rhinestones
- Nail Glue: KISS Precision Nail Glue
- Top layer: Gellen top layer
DIY instructions
- Apply a base coat to your nails to protect them.
- Paint the base of your nails with the nude polish.
- Create the black tips using nail guides or freehand if you’re confident.
- Apply nail glue and place rhinestones strategically on each nail.
- Finish with a top coat to seal the rhinestones and add extra sparkle.
Bright pink coffin nails
These pink glitter coffin nails are perfect for adding a touch of glamour to your look. The gradient effect from solid pink to glitter creates a beautiful transition that catches the light perfectly.
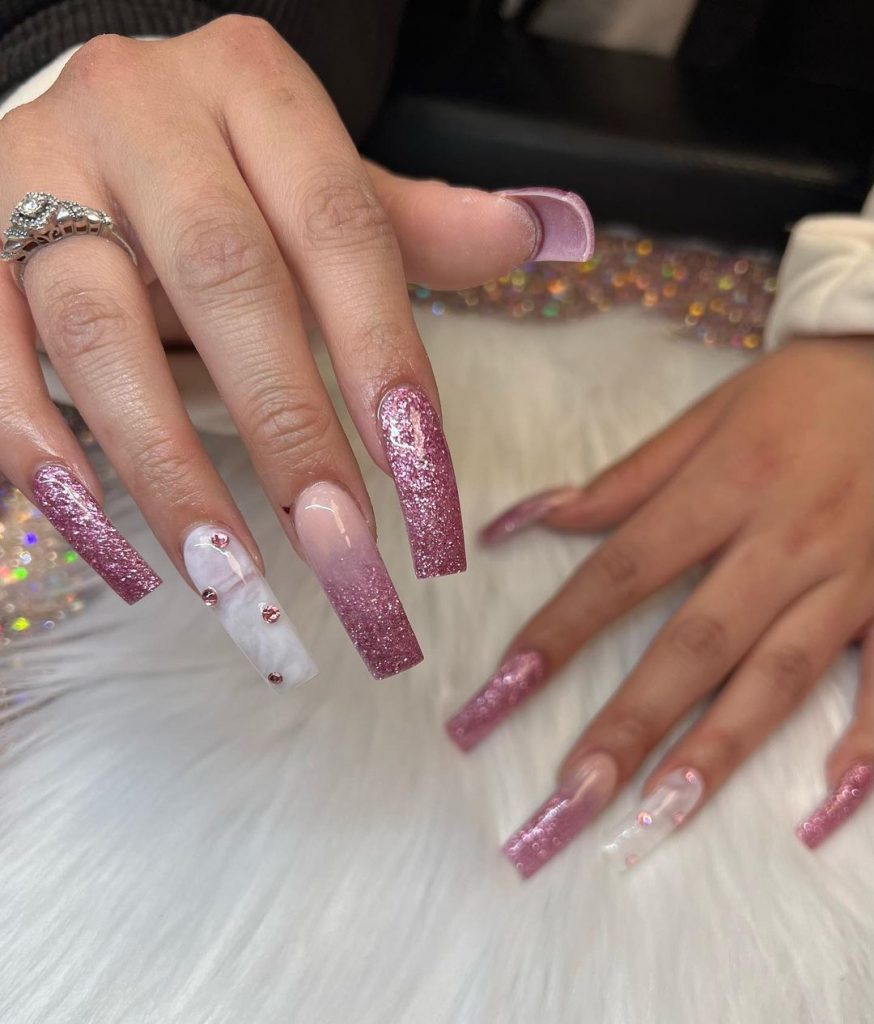
The combination of solid pink and glitter makes these nails fun and elegant. The accent nail with tiny pink rhinestones adds an extra layer of detail, making this design stand out.
Consumables
- Base coat: OPI Nail Envy
- Pink nail polish: OPI in ‘Mod About You’
- Pink glitter: Glitterbels fine glitter in “pink champagne”
- Rhinestones: Swarovski Flatback Crystals in Pink
- Nail Glue: IBD 5 Second Nail Glue
- Top Coat: Essie Gel Couture Top Coat
DIY instructions
- Start with a base coat to protect your nails.
- Apply the pink polish on all nails, creating a gradient effect with the glitter on the tips.
- Use a small brush to apply the glitter to the tips of your nails.
- Add rhinestones to your accent nail using nail glue.
- Seal the design with a top coat to lock in the shine and rhinestones.
Fall coffin nails with a matte and metallic finish
These fall-inspired nails feature a stunning matte orange base with gold foil accent nails. The combination of matte and gold foil creates a unique and elegant look, perfect for the fall season.
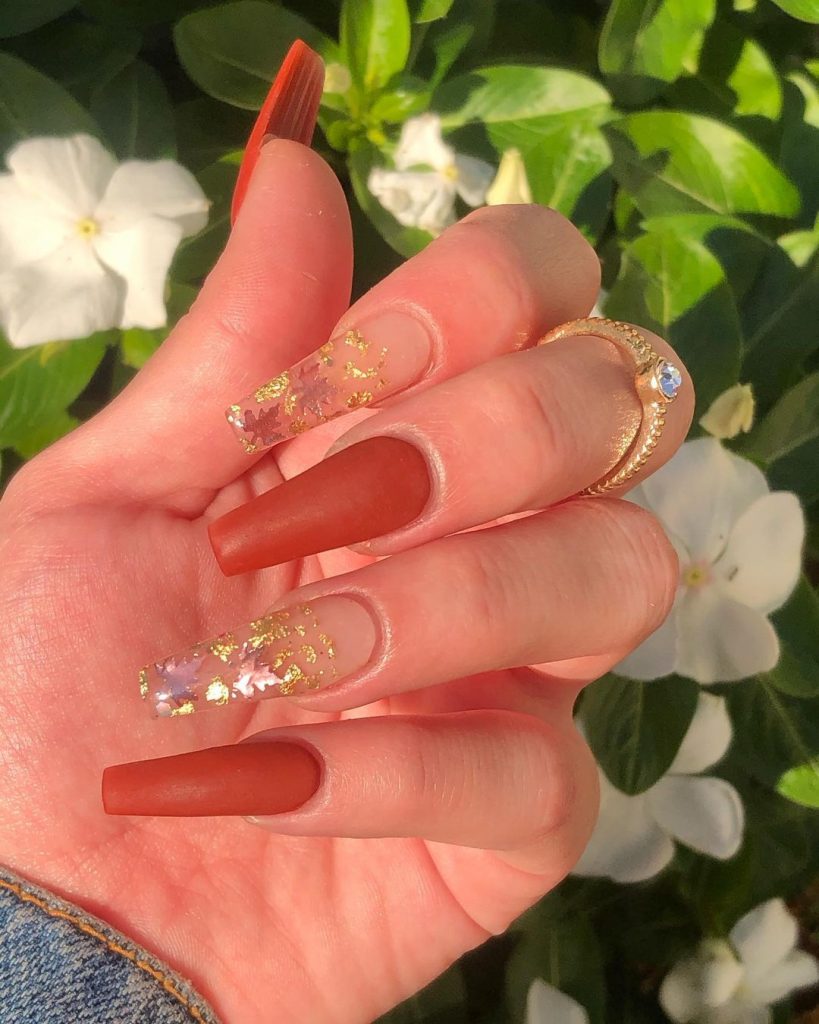
The matte orange color is warm and inviting, while the gold adds a touch of elegance and luxury. This design is perfect for those who want to incorporate the colors of autumn into their manicure.
Consumables
- Base Coat: Butter London Nail Foundation
- Matte Orange Nail Polish: Zoya in ‘Thandie’
- Gold foil: gold foil for nail art
- Top Coat: Essie Matte About You
DIY instructions
- Apply a base coat to your nails.
- Paint all nails with the matte orange polish.
- Apply gold foil to accent nails while the polish is still tacky.
- Seal the design with a matte top coat to maintain the matte finish.
Vibrant red coffin nails
These vibrant red coffin nails are bold and eye-catching, perfect for those who want their nails to stand out. The glossy finish enhances the intensity of the red color, making your nails look polished and elegant.
The bright red color is timeless and versatile, suitable for any occasion. The glossy finish adds a layer of sophistication, making this design ideal for achieving a classic and bold style.
Consumables
- Base layer: ORLY Bonder base layer
- Red nail polish: OPI in ‘Big Apple Red’
- Top Coat: Seche Vite Quick Dry Top Coat
DIY instructions
- Start with a base coat to protect your nails.
- Apply two coats of red polish to achieve an intense and uniform color.
- Finish with a top coat to add a glossy shine and prolong the life of your manicure.
Coral Coffin Nails
These coral coffin nails are vibrant and cheerful, perfect for adding a pop of color to your look. The glossy finish enhances the bright coral hue, making your nails look fresh and lively.
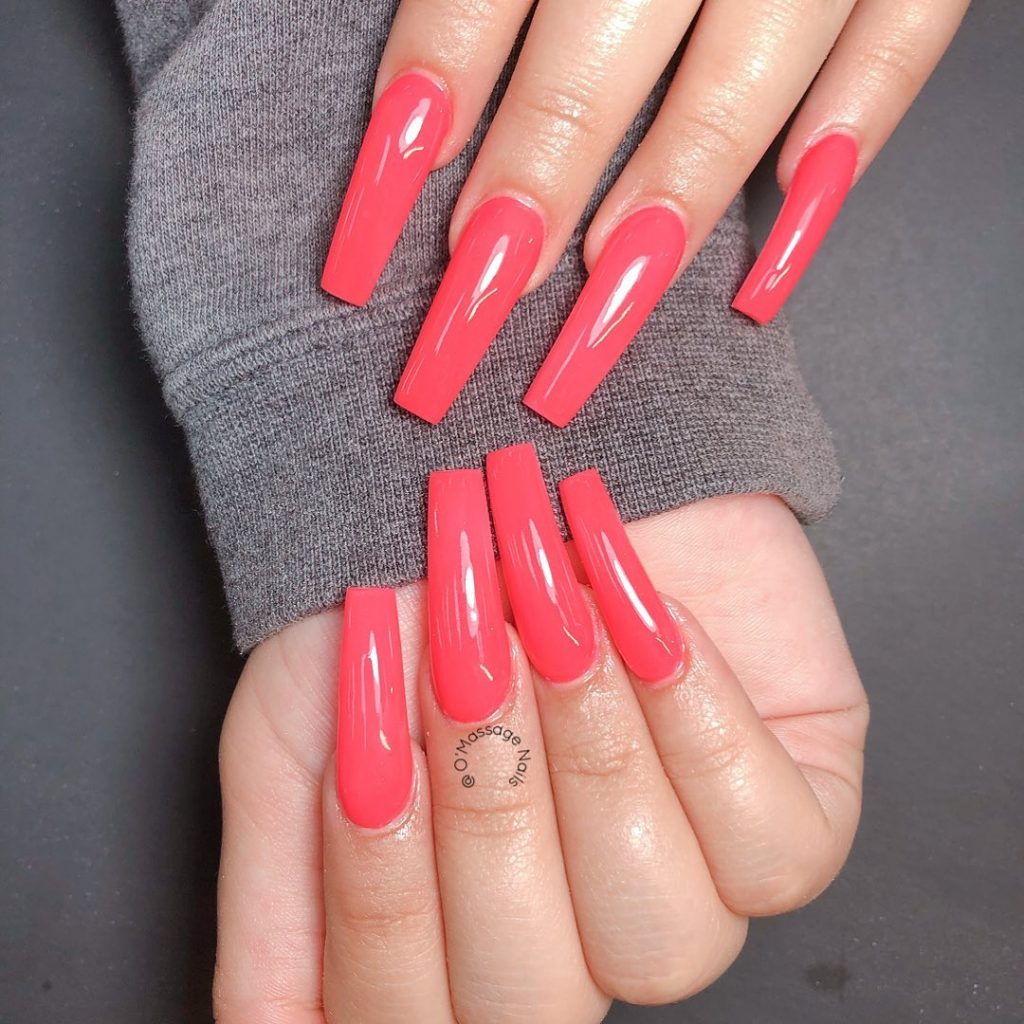
The coral color is fun and cheerful, making these nails ideal for any casual or semi-formal occasion. The high-gloss finish adds a touch of elegance, making this design fun and chic.
Consumables
- Base coat: CND adhesive base coat
- Coral nail polish: Essie in ‘Tart Deco’
- Top layer: Gellen top layer
DIY instructions
- Apply a base coat to protect your nails.
- Paint your nails with two coats of coral polish for an even, vibrant color.
- Finish with a top coat to add a glossy finish and protect the polish.
Modern French Coffin Nails
These modern coffin style French nails combine traditional and contemporary styles. The design features a nude base with varied tips in shades of brown, white and pink, giving a fresh twist to the classic French manicure.
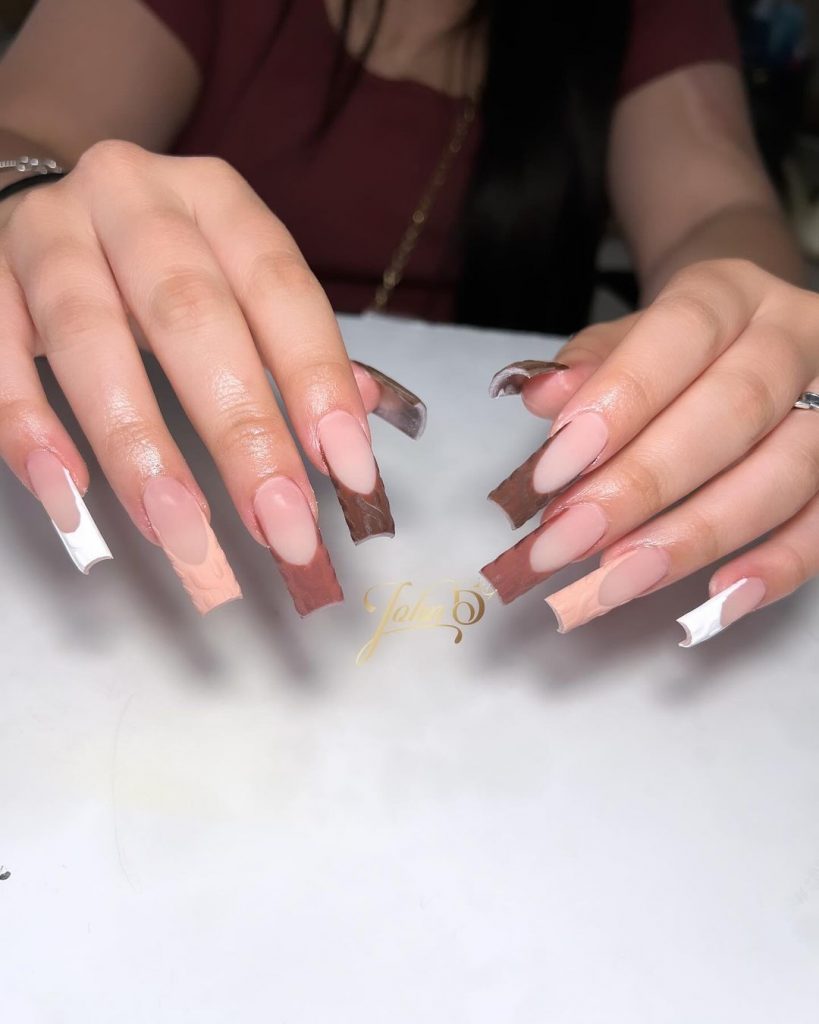
The combination of colors at the tips brings a fun and sophisticated element to the nails. This design is perfect for those who love the French manicure style but want something a little more original and modern.
Consumables
- Base Coat: OPI Natural Nail Base Coat
- Nude nail polish: Essie in ‘Bare With Me’
- Brown Nail Polish: OPI in ‘You Don’t Know Jacques’
- White nail polish: Essie in ‘Blanc’
- Pink nail polish: Essie in ‘Sugar Daddy’
- Top Coat: Seche Vite Quick Dry Top Coat
DIY instructions
- Apply a base coat to your nails to protect them.
- Paint the base of your nails with the nude polish.
- Using a thin nail brush, paint the tips alternating brown, white and pink.
- Finish with a top coat to seal the design and add shine.
Coffin nails with gold and blue leaves
These stunning gold and blue leaf coffin nails are perfect for those looking to add a touch of elegance and sophistication to their look. The light blue matte polish is perfectly complemented by intricate gold leaf designs on the accent nails.
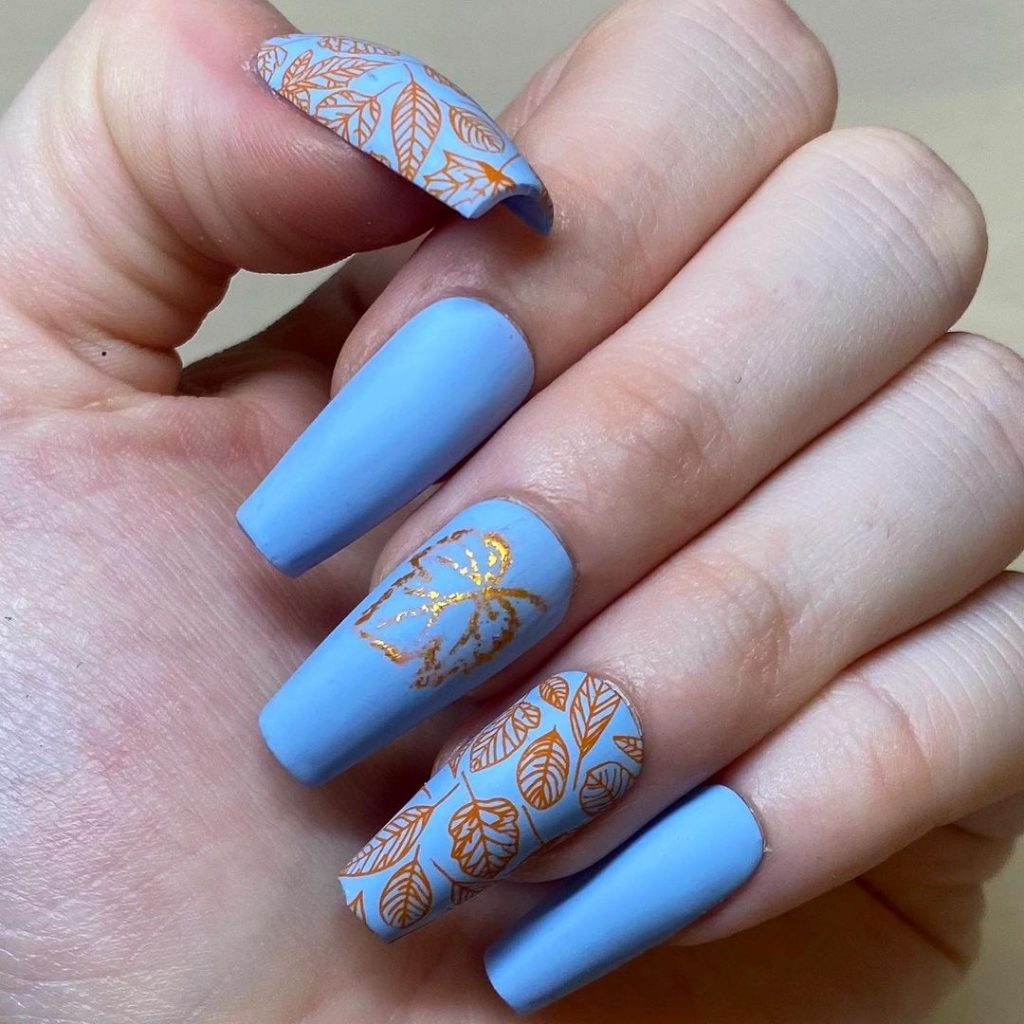
The combination of matte blue and gold leaves creates a serene and luxurious feel. This design is ideal for both everyday use and special occasions and offers a versatile and elegant style.
Consumables
- Base Coat: ZOYA Anchor Base Coat
- Blue nail polish: ZOYA in ‘Blu’
- Gold Leaf: Gold foil for nail art
- Top Coat: Essie Matte About You
DIY instructions
- Apply a base coat to your nails.
- Paint all nails with blue polish.
- Once dry, apply the gold leaf to your accent nails using a small brush.
- Seal the design with a matte top coat to ensure longevity.
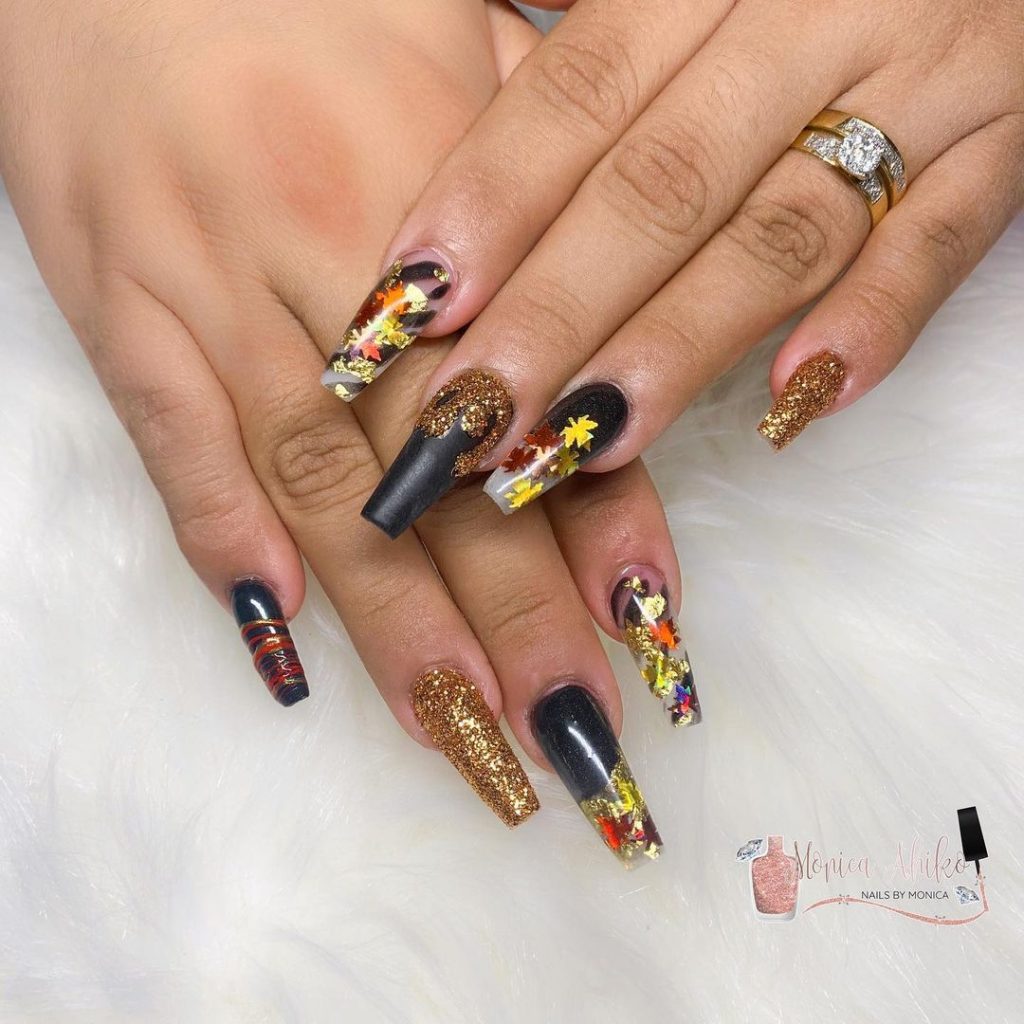
Coffin nails with autumn leaves
These fall-themed coffin nails are a perfect representation of the fall season. The design features matte black nails with nail detailing featuring colorful fall leaves and gold glitter.
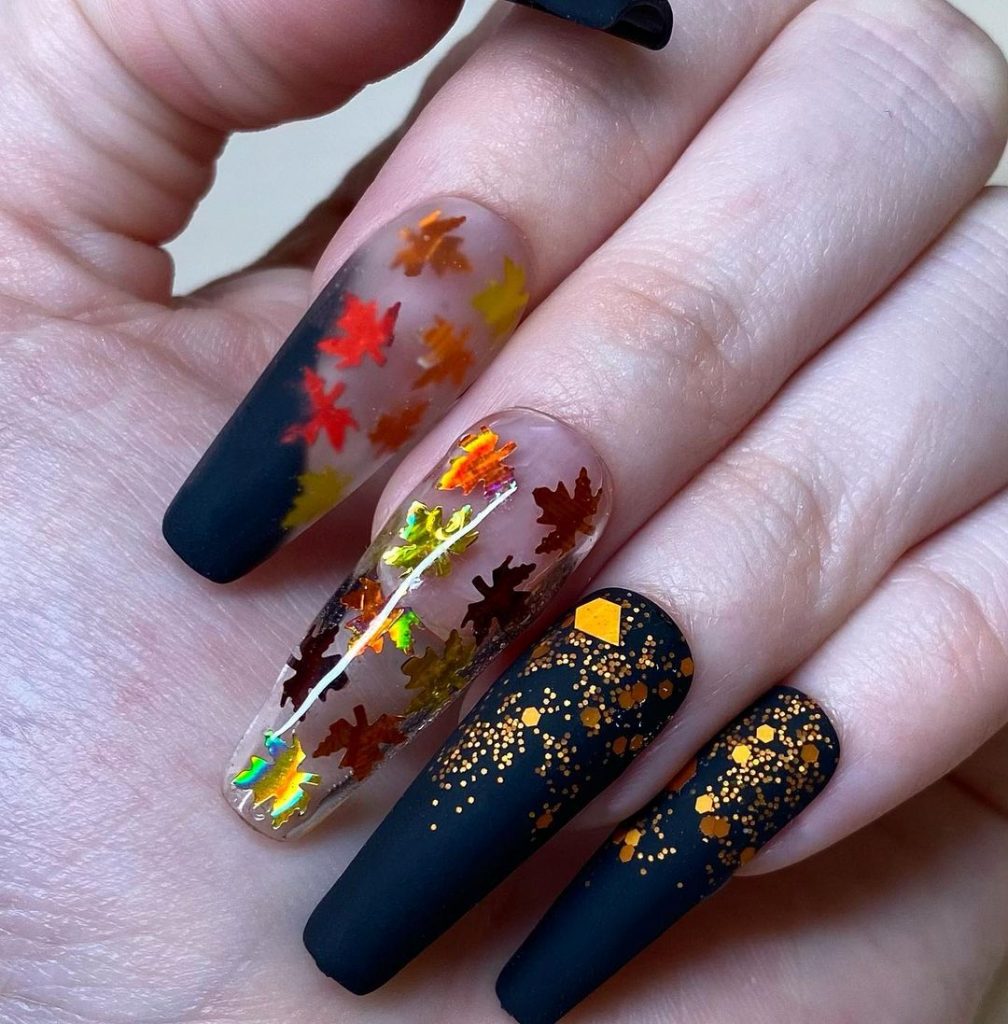
The contrast between the matte black and the vibrant leaves makes these nails stand out. The gold glitter adds a touch of sparkle, making this design festive and elegant.
Consumables
- Base layer: ORLY Bonder base layer
- Black Nail Polish: OPI in ‘Black Onyx’
- Fall Leaf Decals – Fall Leaf Nail Decals from Born Pretty Store
- Golden glow: Kiara Sky’s spreadable powder in ’24K’
- Top Coat: Essie Matte About You
DIY instructions
- Start with a base coat to protect your nails.
- Apply black polish to all nails except accent nails.
- Add fall leaf decals to accent nails and sprinkle gold glitter on top.
- Seal with a matte top coat to finish the look.
Starry Night Design Coffin Nails
These starry night coffin nails are a gorgeous combination of deep purple and glittery stars. The glittery purple polish creates a cosmic effect, while the gold star decals add a whimsical touch.
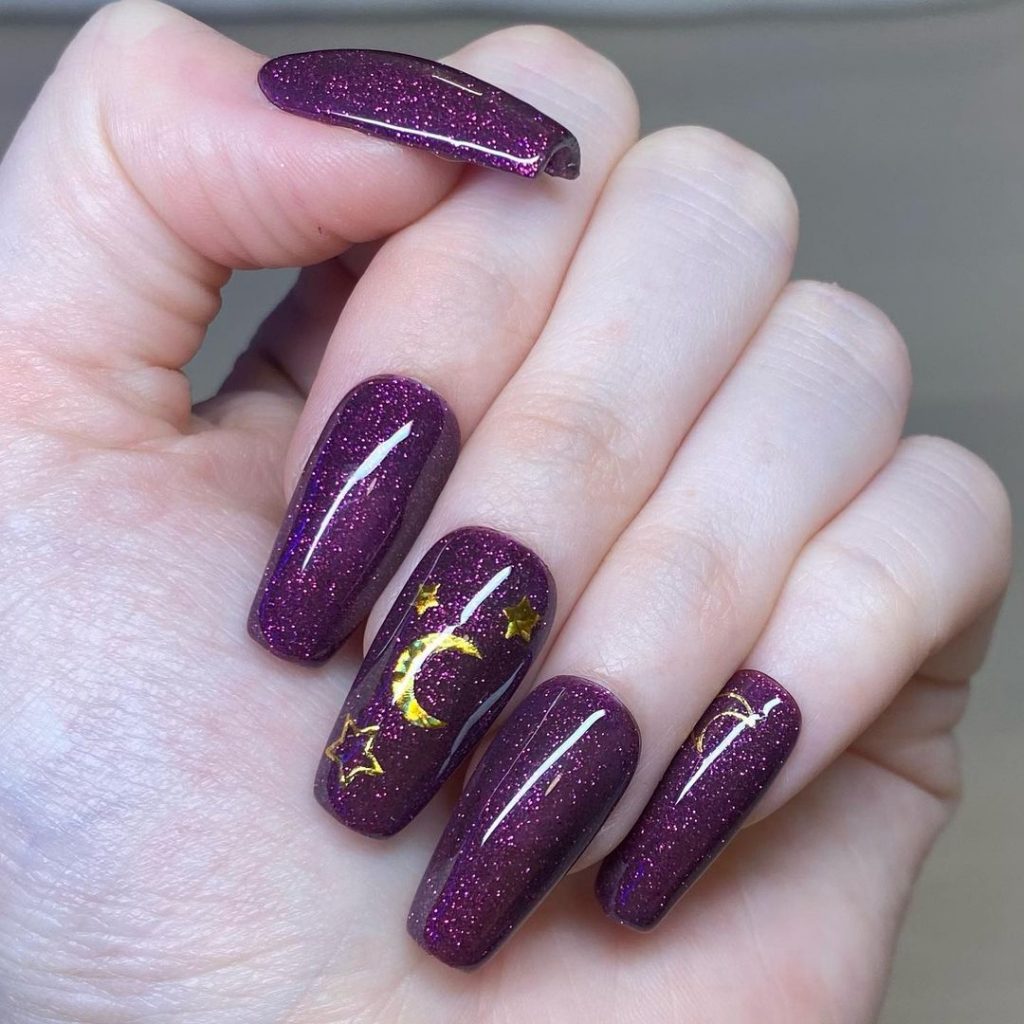
The deep purple color is perfect for the fall season and the star details make these nails truly magical. This design is ideal for those who love a bit of sparkle and fantasy in their manicure.
Consumables
- Base Coat: Butter London Nail Foundation
- Purple Glitter Nail Polish: ILNP in ‘Fame’
- Gold Star Decals – Star Nail Stickers from Born Pretty Store
- Top layer: Gellen top layer
DIY instructions
- Apply a base coat to your nails.
- Paint all nails with the purple glitter polish.
- Once dry, add gold star decals to your nails.
- Finish with a top coat to protect the design and add extra shine.
Nude and black glitter coffin nails
These black and nude coffin nails feature a sophisticated combination of glitter and rhinestones. The design includes black nails with glitter, nude nails with rhinestones, and a combination of both for a striking effect.
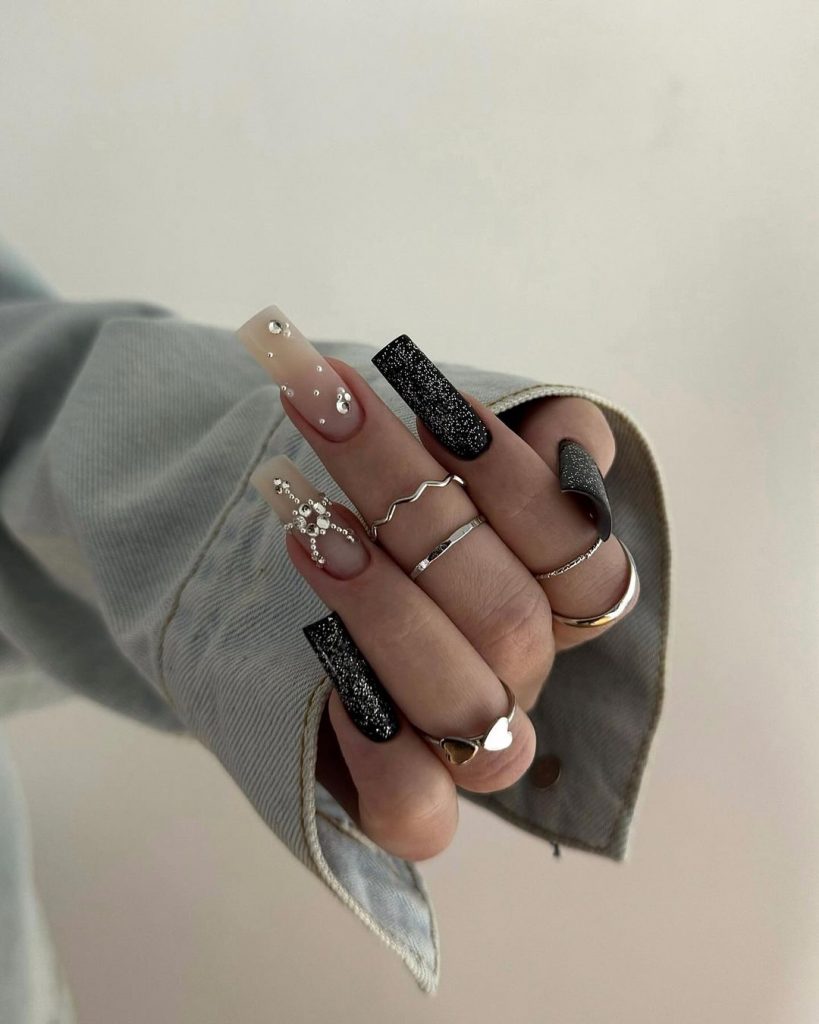
The combination of black and nude with glitter and rhinestones creates a chic and glamorous look. This design is perfect for both formal and informal occasions, offering versatility and elegance.
Consumables
- Base coat: OPI Nail Envy
- Nude Nail Polish: Essie in ‘Mademoiselle’
- Black Glitter Nail Polish: Sally Hansen in ‘Black Diamonds’
- Rhinestones: Swarovski flat back crystals
- Nail Glue: KISS Precision Nail Glue
- Top Coat: Seche Vite Quick Dry Top Coat
DIY instructions
- Apply a base coat to protect your nails.
- Paint some nails with nude polish and others with shiny black polish.
- Add rhinestones to nude nails using nail glue.
- Finish with a top coat to seal the design and add shine.
Monochrome leopard print coffin nails
These monochromatic leopard print coffin nails feature a chic black and white animal print design with a unique decorative ring on one nail. This modern take on the classic leopard print is both edgy and chic, perfect for making a bold statement.
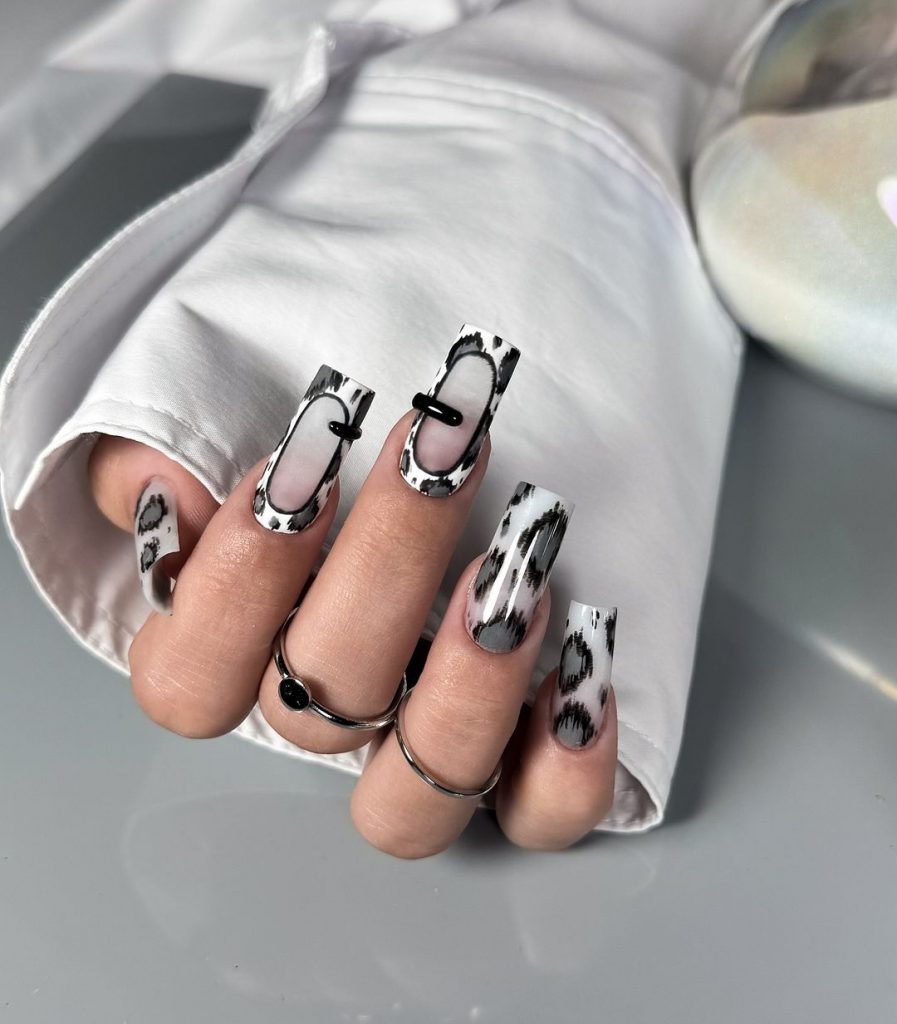
The black and white color combination gives it a sophisticated touch, while the animal print adds a playful touch. The decorative ring enhances the design and gives it an extra touch of uniqueness.
Consumables
- Base Coat: OPI Natural Nail Base Coat
- White nail polish: Essie in ‘Blanc’
- Black Nail Polish: Sally Hansen Hard as Nails Xtreme Wear in ‘Black Out’
- Nail Art Brushes: Winstonia Nail Art Brushes
- Decorative nail rings from AliExpress
- Top Coat: Seche Vite Quick Dry Top Coat
DIY instructions
- Apply a base coat to protect your nails.
- Paint your nails with white polish as a base color.
- Use a nail art brush to create the leopard print with black polish.
- Add the accent ring to the designated nail.
- Seal the design with a top coat to ensure longevity.
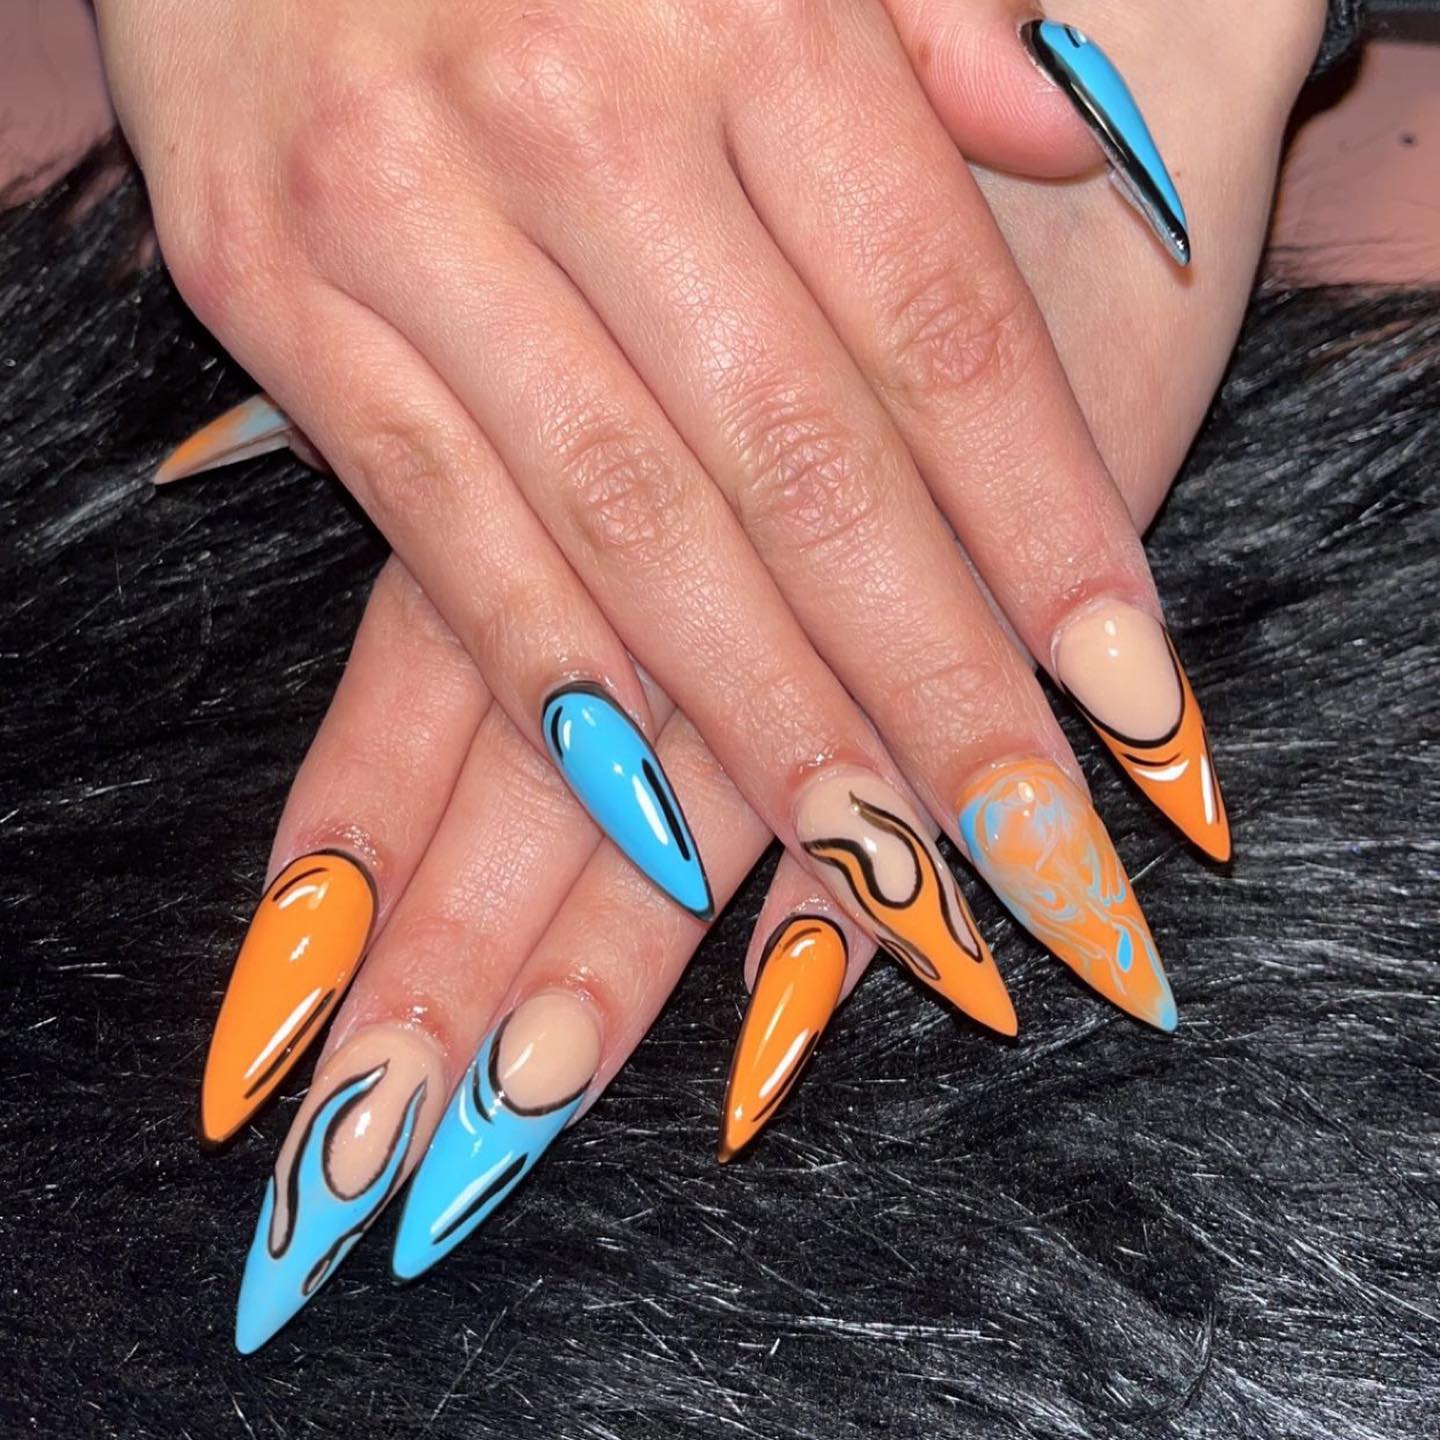
Coffin nails with orange spirals
These vibrant orange coffin nails are perfect for adding a pop of color to your fall look. The swirling patterns in a bright orange hue on a nude base create a dynamic and eye-catching design.
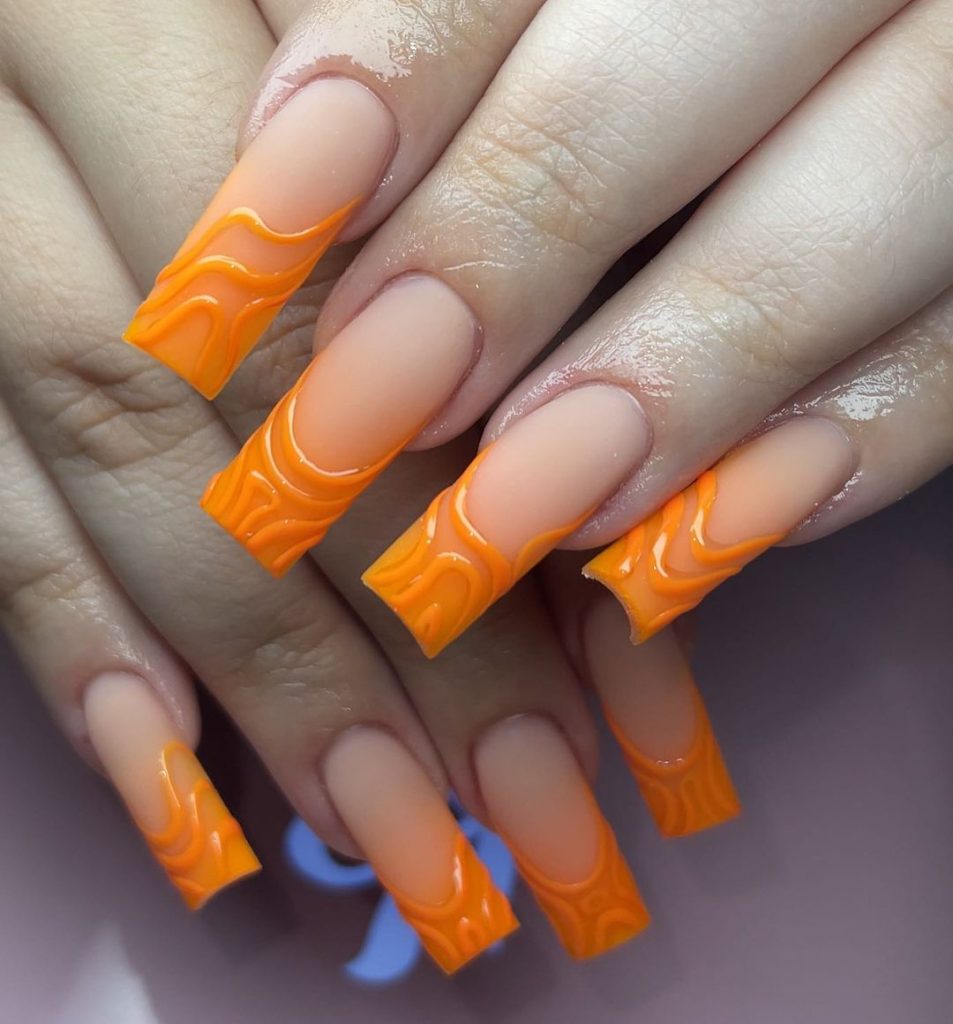
The bold orange swirls add a fun and energetic vibe, making these nails perfect for anyone who wants to stand out. The contrast between the nude base and the orange design adds depth and interest to the manicure.
Consumables
- Base Layer: Essie Here to Stay Base Layer
- Nude nail polish: OPI in ‘Samoan Sand’
- Orange nail polish: China Glaze in ‘Orange Knockout’
- Nail Art Brush: Beetles Nail Art Liner Brushes
- Top Coat: Sally Hansen Miracle Gel Top Coat
DIY instructions
- Apply a base coat to your nails to protect them.
- Paint the base of your nails with the nude polish.
- Use a nail art brush to create spiral patterns with the orange polish.
- Finish with a top coat to seal the design and add shine.
Elegant coffin nails with gold leaves
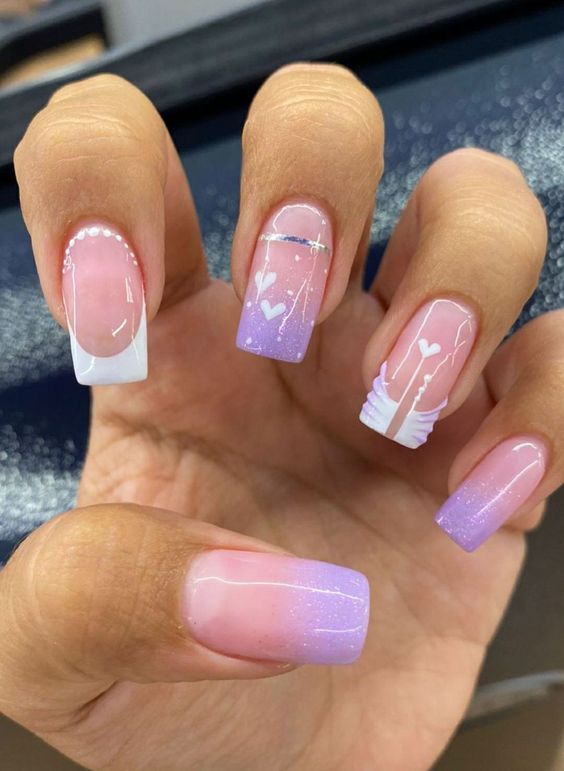
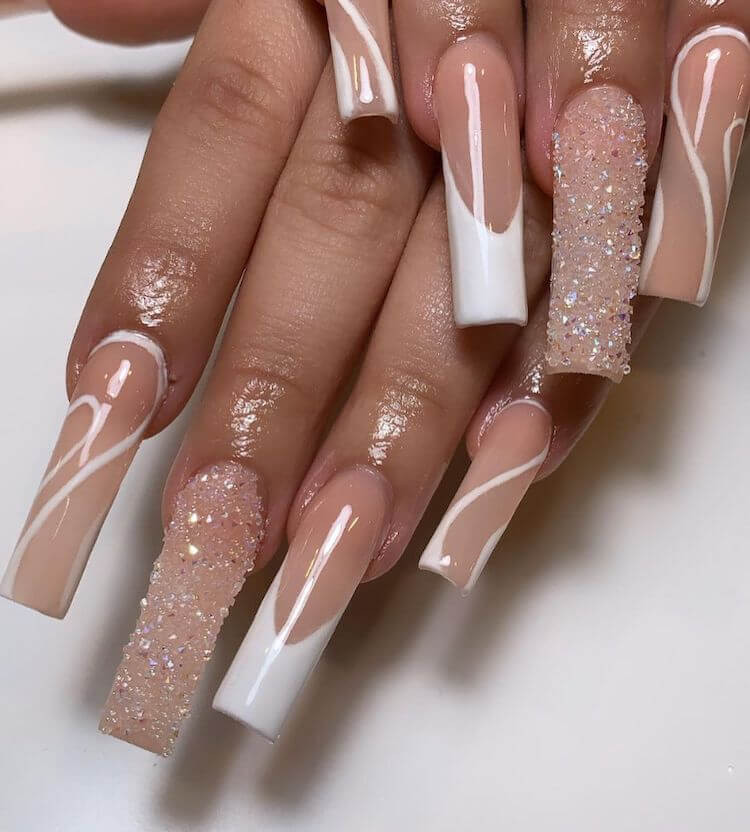
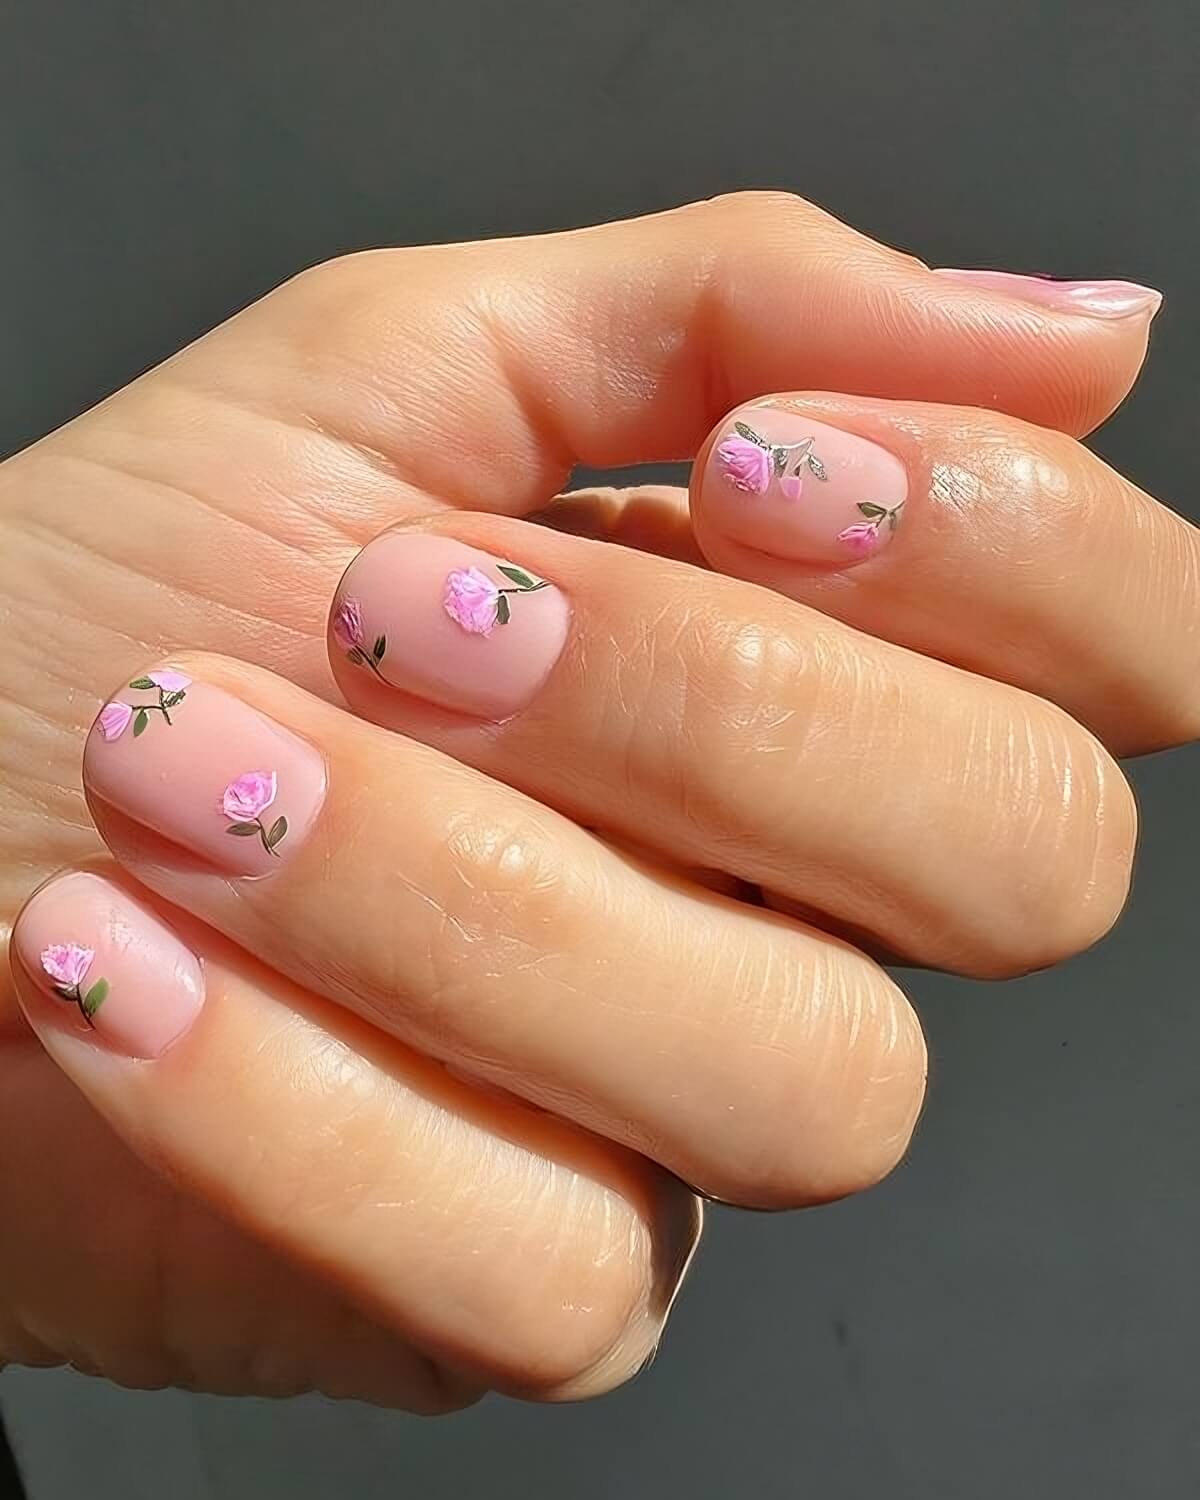
These elegant gold leaf coffin nails feature a soft pink base with delicate white marble and gold leaf details. The combination of these elements creates a sophisticated and luxurious style.

The pink and white marble effect is subtle and elegant, while the gold leaf adds a touch of glamour. This design is perfect for any formal occasion or for those who love a refined and elegant manicure.
Consumables
- Base Coat: Butter London Nail Foundation
- Pink nail polish: Essie in ‘Fiji’
- White nail polish: Essie in ‘Blanc’
- Gold Leaf: Gold foil for nail art
- Top layer: Gellen top layer
DIY instructions
- Apply a base coat to your nails.
- Paint all nails with pink polish.
- Create the marble effect on accent nails by mixing white polish with a nail art brush.
- Apply gold leaf to marble accents.
- Seal the design with a top coat to ensure longevity.
Black geometric French coffin nails
These black geometric coffin shaped French nails offer a modern twist on the classic French manicure. The nude base is complemented by black geometric lines, creating a sleek and stylish look.
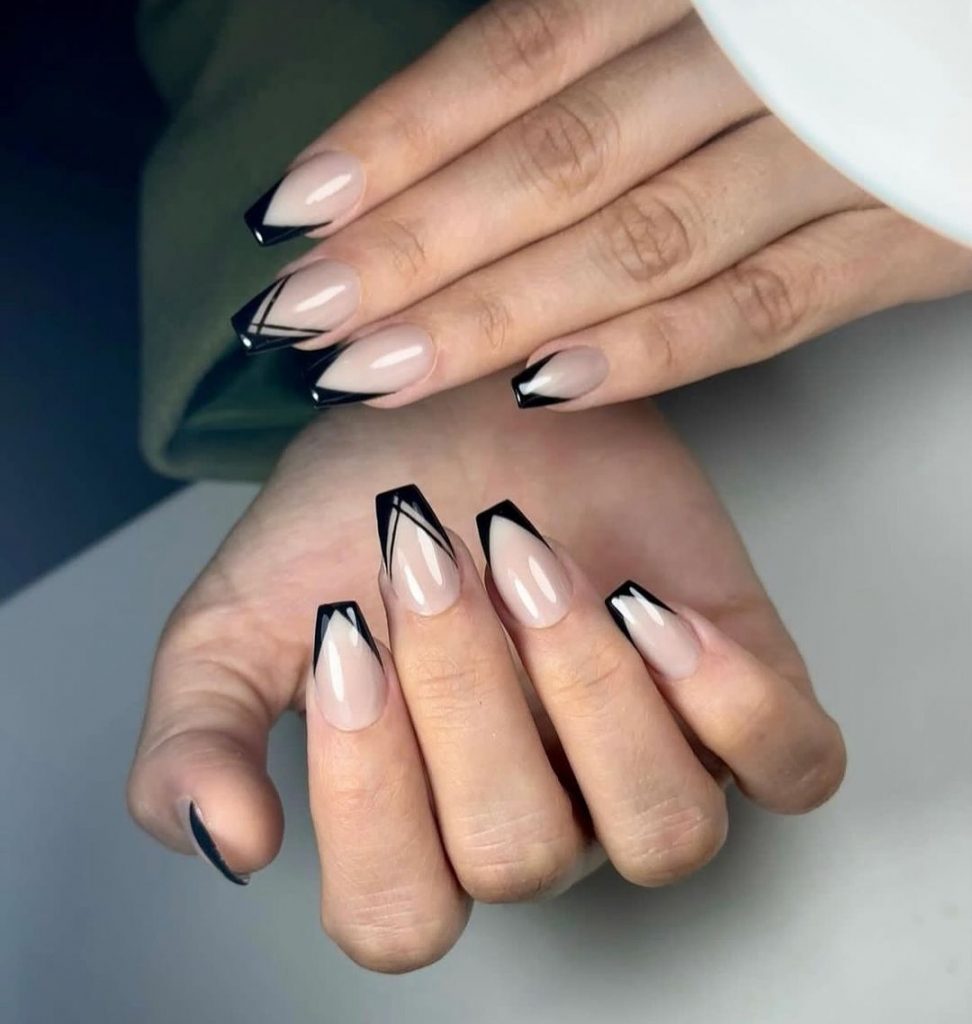
Geometric lines add a contemporary touch to the nails, making them perfect for both professional and casual settings. The simplicity of the design ensures that it remains elegant and understated.
Consumables
- Base Coat: ZOYA Anchor Base Coat
- Nude nail polish: Essie in ‘Ballet Slippers’
- Black Nail Polish: OPI in ‘Black Onyx’
- Nail Art Brushes: Winstonia Nail Art Brushes
- Top Coat: Essie Gel Couture Top Coat
DIY instructions
- Apply a base coat to your nails.
- Paint the base of your nails with the nude polish.
- Use a nail brush to create geometric lines with black polish.
- Finish with a top coat to seal the design and add shine.
Soft pink gradient coffin nails
These soft pink ombre coffin nails feature a gradient effect from nude to white, creating a delicate and feminine look. The subtle transition of colors is perfect for achieving a natural yet polished look.
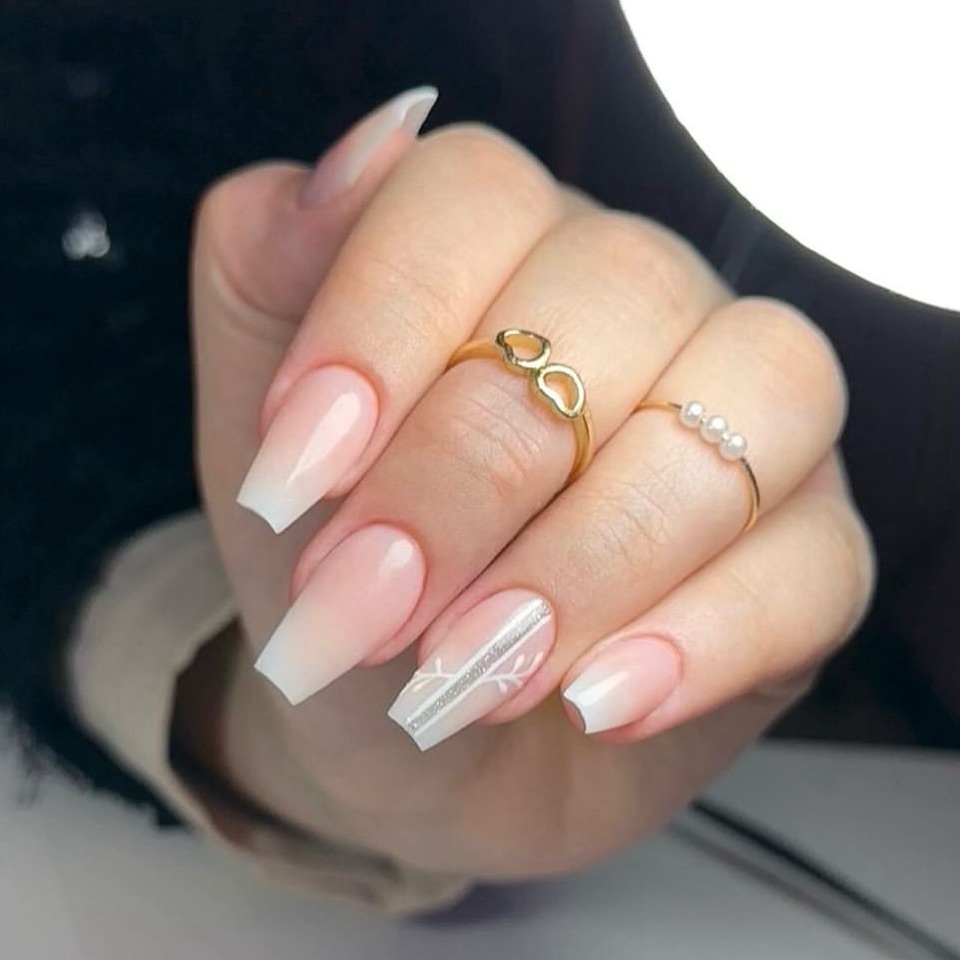
The ombré effect is elegant and versatile, suitable for any occasion. This design is ideal for those who prefer a minimalist and chic style.
Consumables
- Base coat: OPI Nail Envy
- Nude Nail Polish: Essie in ‘Mademoiselle’
- White nail polish: Essie in ‘Blanc’
- Makeup Sponge: Triangular Makeup Sponges
- Top Coat: Seche Vite Quick Dry Top Coat
DIY instructions
- Apply a base coat to protect your nails.
- Paint a base coat of nude polish on your nails.
- Use a makeup sponge to apply white polish to the tips, blending downwards for an ombré effect.
- Finish with a top coat to soften the gradient and add shine.
Holographic coffin nails
These holographic coffin nails are mesmerizing with their iridescent shine and subtle color shifts. The holographic effect creates a multidimensional look that is eye-catching and stylish.

The glossy finish of these nails makes them perfect for those who love a little sparkle in their manicure. The light-reflecting properties of the holographic polish give the nails a unique and captivating appearance.
Consumables
- Base coat: OPI Nail Envy
- Holographic Nail Polish: ILNP in ‘Mega’
- Top Coat: Seche Vite Quick Dry Top Coat
DIY instructions
- Apply a base coat to your nails to protect them.
- Paint your nails with two coats of holographic polish for full coverage.
- Finish with a top coat to enhance the shine and durability of the holographic effect.
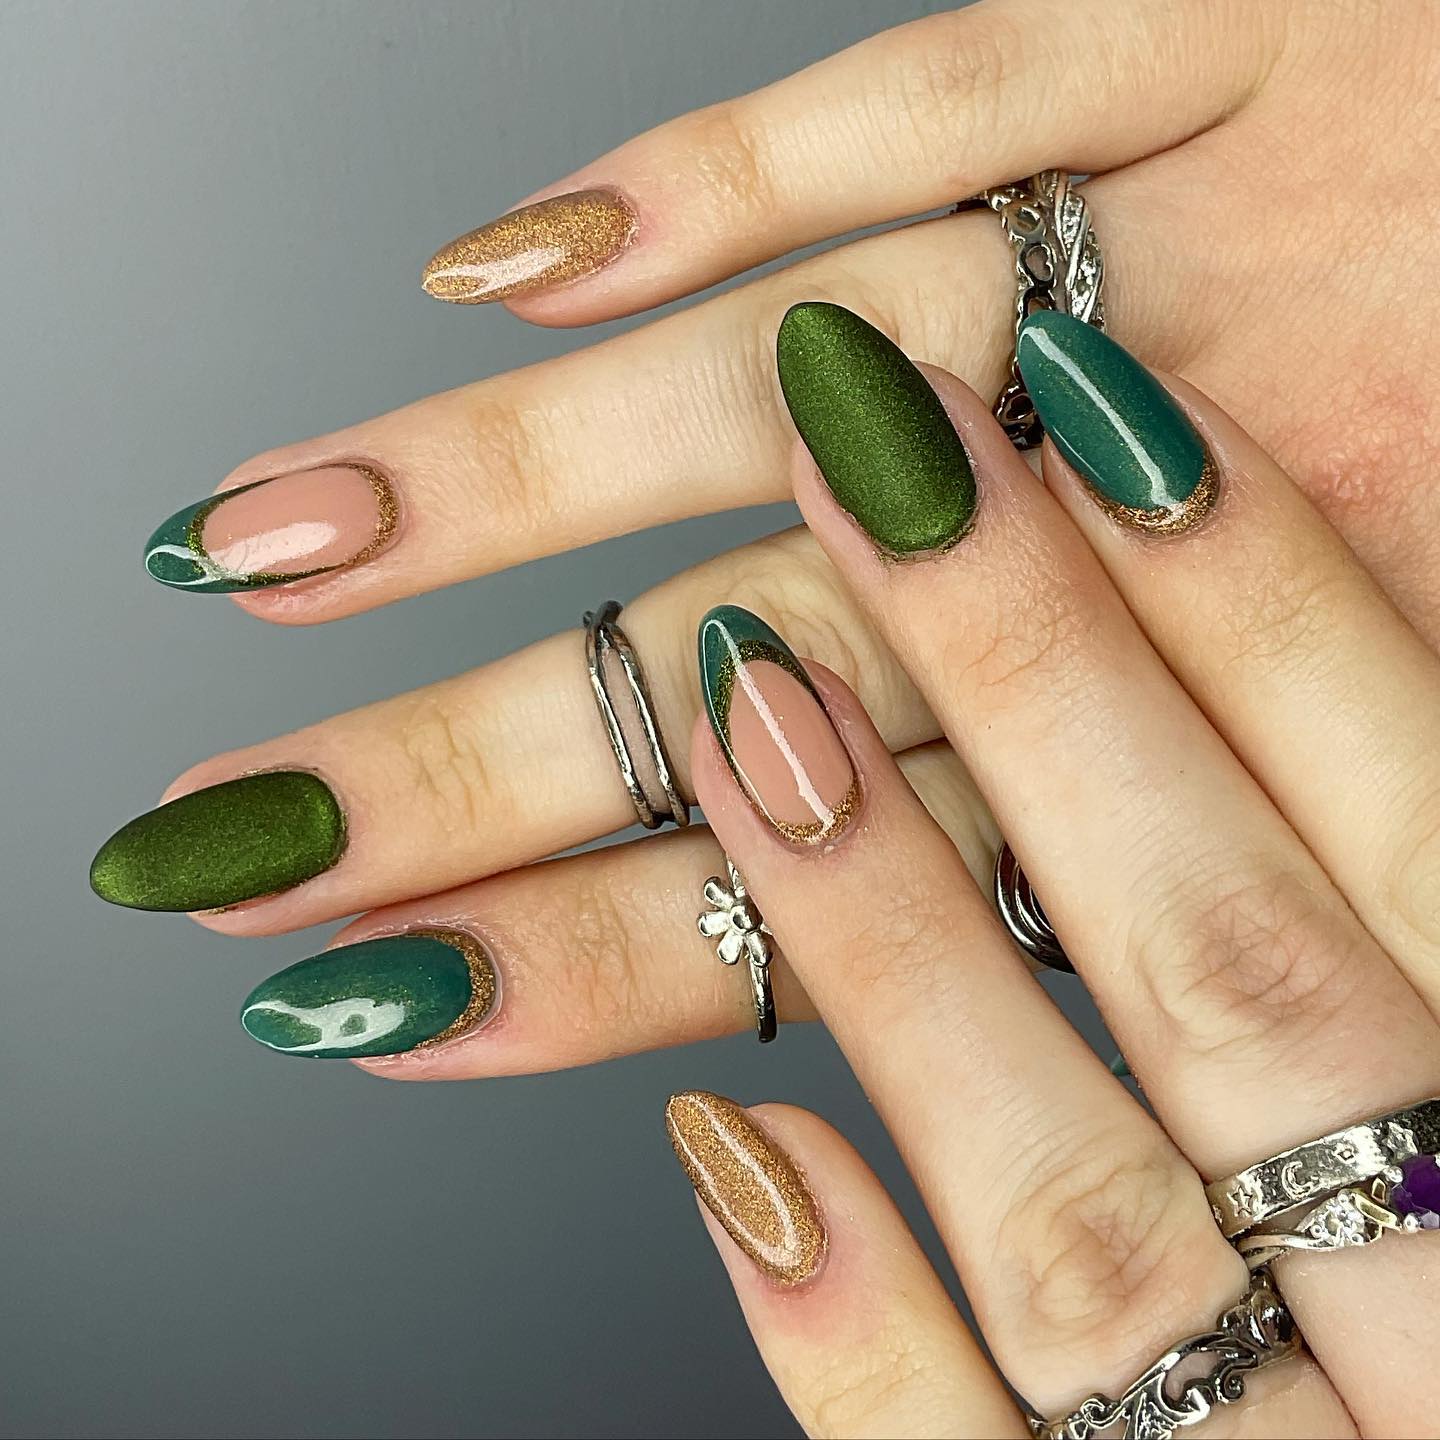
Green and gold leopard design coffin nails
These green and gold leopard print coffin nails combine a deep green polish with elegant gold leaf and leopard print details. The design is modern and sophisticated, making it perfect for the fall season.
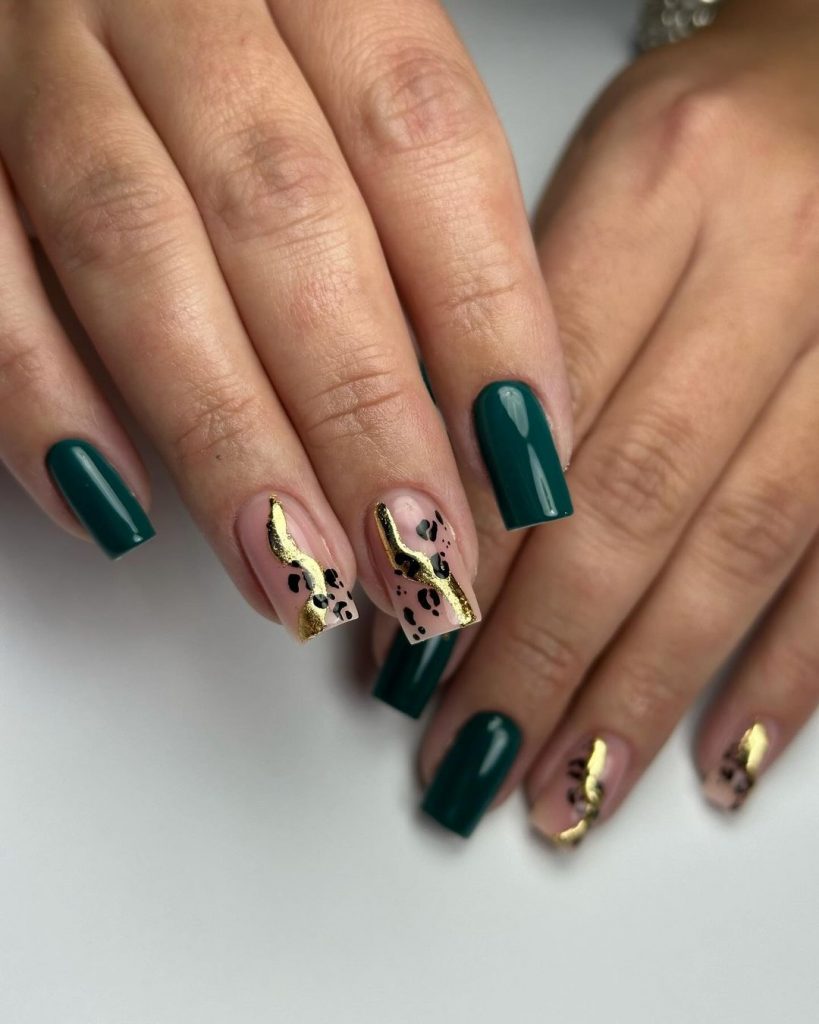
The deep green color combined with gold details creates a luxurious look. The leopard print adds a fun and cheerful element, making these nails a standout choice.
Consumables
- Base Layer: Essie Here to Stay Base Layer
- Green nail polish: Essie in ‘Going Incognito’
- Gold Leaf: Gold foil for nail art
- Leopard Print Nail Decals – Leopard Nail Stickers from Born Pretty Store
- Top Coat: Sally Hansen Miracle Gel Top Coat
DIY instructions
- Apply a base coat to your nails.
- Paint most of your nails with green polish, leaving the accent nails for leopard print and gold leaf.
- Apply gold leaf to accent nails and add leopard print decals.
- Seal the design with a top coat to ensure longevity and shine.
Nude and shiny coffin nails
These nude and glittery coffin nails are the epitome of glamour. The nude base is complemented by rhinestone detailing, creating a dazzling and sophisticated look.
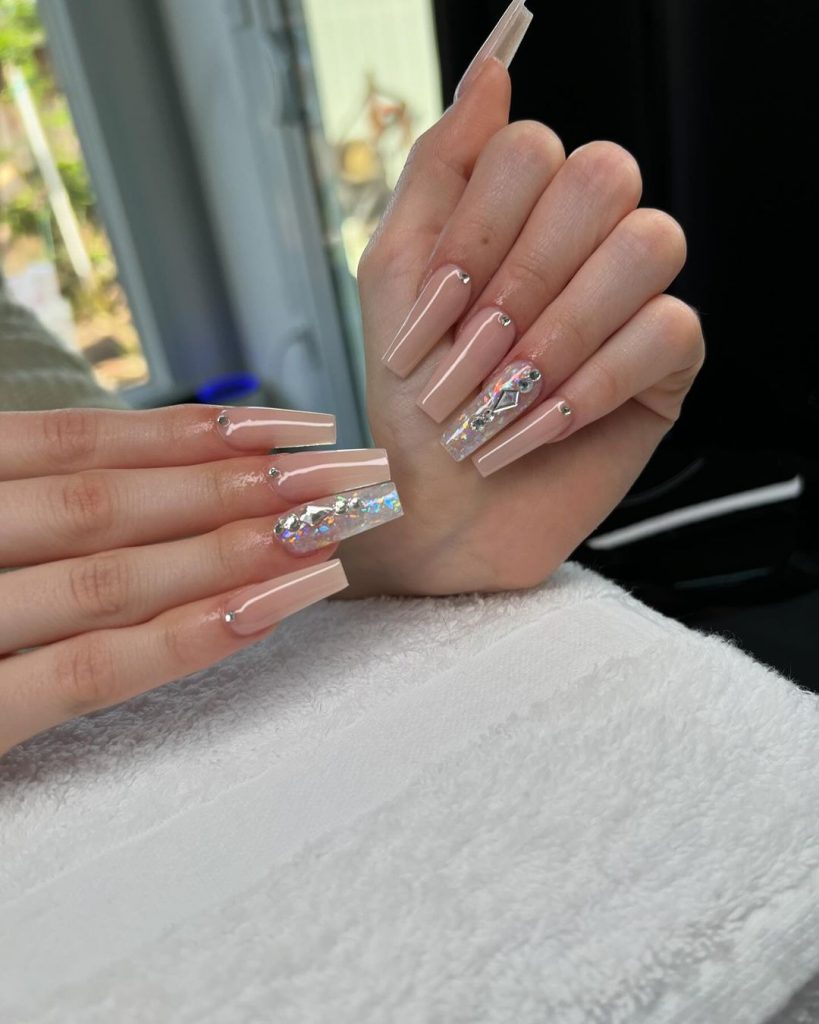
The simplicity of the nude polish is enhanced by the sparkling rhinestones, making these nails perfect for special occasions or when you want to add a touch of luxury to your manicure.
Consumables
- Base Coat: OPI Natural Nail Base Coat
- Nude nail polish: Essie in ‘Topless & Barefoot’
- Rhinestones: Swarovski flat back crystals
- Nail Glue: KISS Precision Nail Glue
- Top layer: Gellen top layer
DIY instructions
- Apply a base coat to protect your nails.
- Paint your nails with nude polish.
- Apply rhinestones to your nails using nail glue to achieve a shiny effect.
- Finish with a top coat to seal the rhinestones and add sparkle.
Brown Marble Coffin Nails
These brown marble coffin nails are perfect for the fall season. The design features a combination of brown and nude marble patterns with gold accents, creating a luxurious and elegant look.
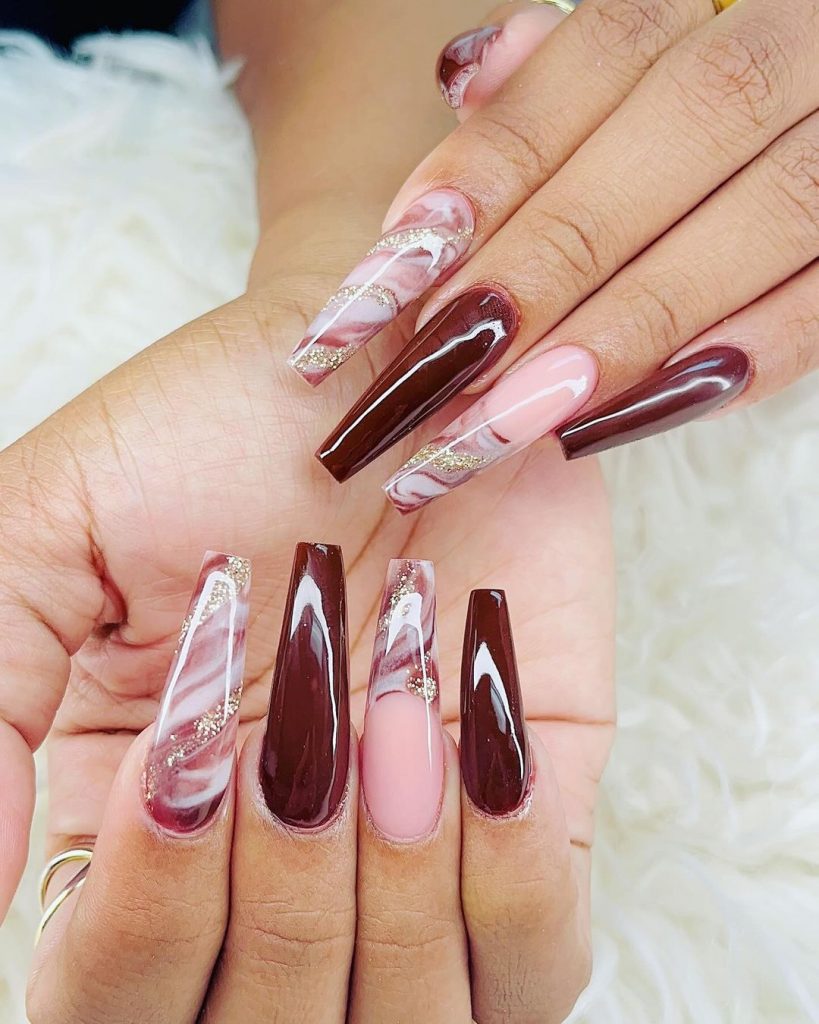
The combination of brown and nude with marble motifs gives these nails a sophisticated and timeless appeal. The golden details add a touch of glamour, making this design perfect for any occasion.
Consumables
- Base layer: ORLY Bonder base layer
- Brown Nail Polish: OPI in ‘Squeaker of the House’
- Nude nail polish: Essie in ‘Ballet Slippers’
- Gold foils for nail art: gold foils for nail art
- Top Coat: Seche Vite Quick Dry Top Coat
DIY instructions
- Apply a base coat to your nails.
- Paint your nails with brown and nude nail polishes, alternating the colors.
- Create marble patterns on accent nails by mixing brown and nude polishes with a thin brush.
- Apply gold foil details and finish with a top coat to seal the design.
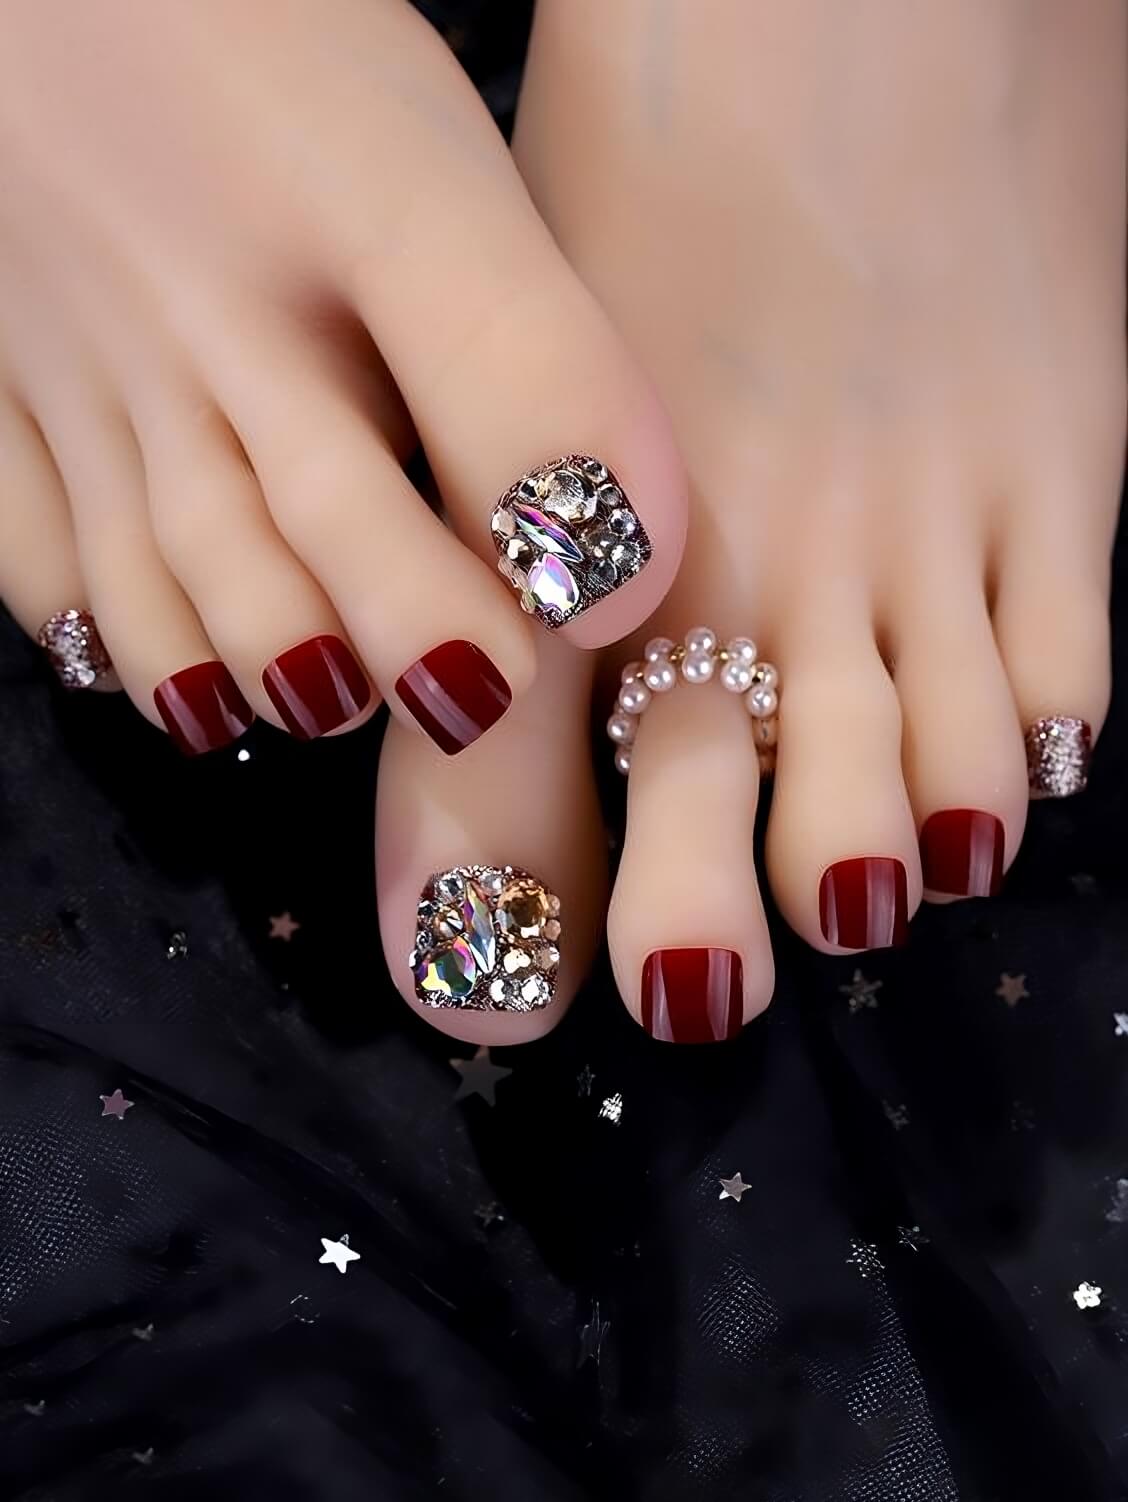
Coffin nails with burgundy and black flowers
These burgundy and black floral coffin nails are eye-catching and chic. The deep burgundy polish is complemented by black floral details, creating a sophisticated and elegant look.
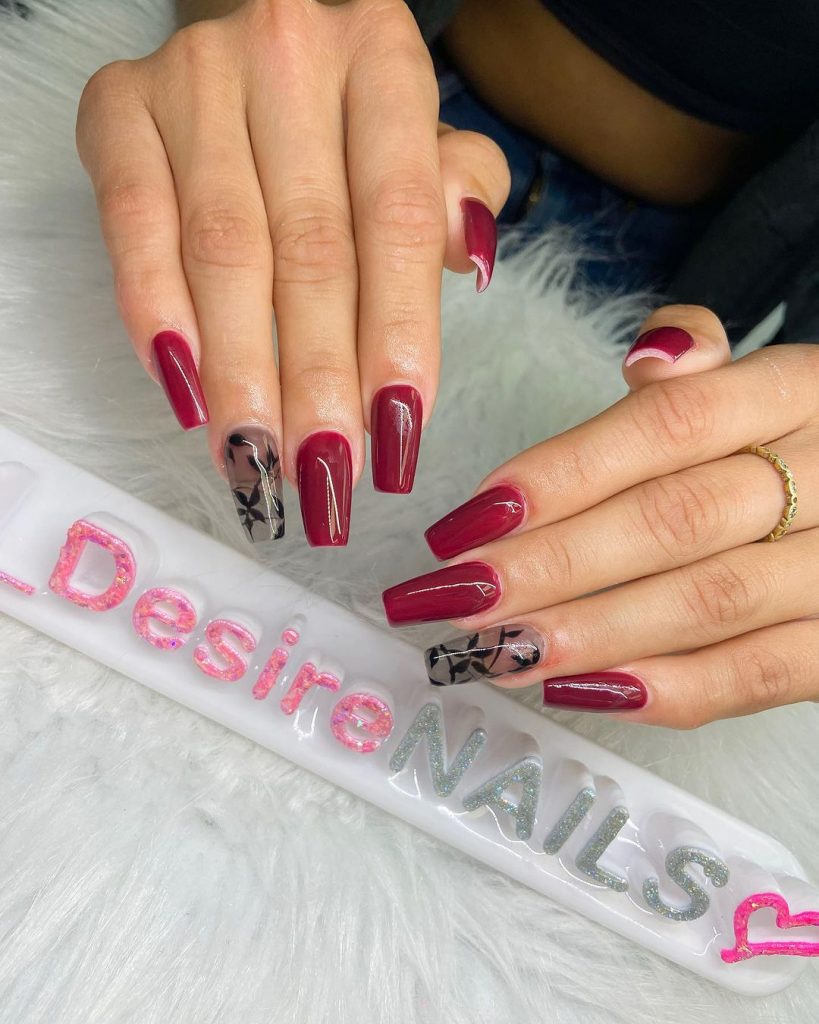
The deep burgundy color is perfect for fall and the black floral details add a touch of drama. This design is ideal for those who love dark, luxurious colors and intricate patterns.
Consumables
- Base Coat: ZOYA Anchor Base Coat
- Burgundy Nail Polish: Essie in ‘Wicked’
- Black Nail Polish: OPI in ‘Black Onyx’
- Nail Art Brushes: Winstonia Nail Art Brushes
- Top Coat: Essie Gel Couture Top Coat
DIY instructions
- Apply a base coat to your nails.
- Paint your nails with burgundy polish.
- Use a nail art brush to create floral designs with black nail polish on accent nails.
- Finish with a top coat to seal the design and add shine.